Showing posts with label Godhand. Show all posts

Sunday, December 1, 2024

Building a Resin Kit - PRR X37 Boxcar

For this first resin boxcar build, I’m going into somewhat deeper detail on the steps involved than one might typically see online, in hopes that the information may be useful for others just getting started, like me.

 In some respects, modern resin freight car kits are similar to styrene kits, containing a one piece carbody, a floor, or underbody, and various detail parts that are added. They differ in that they are all unpainted and usually require the modeler to furnish some items, such as trucks or styrene shapes and wire, and possibly decals or brake components also.  The construction steps are similar, although sometimes more involved.  Many who build resin kits will also do some research to customize the model for their modeling era or to match a specific prototype variation.  This aspect is one that I find enjoyable.

There is a great variety of prototype information available, both printed and on the internet.  This is worthy of its own post in the near future.  Kit instructions range from the greatly detailed to cursory, depending on the source.  It is worth the effort to do some searches online or to look for information and photos in reference books and magazines, if they are available to you.

After unboxing the kit and inspecting the pieces provided, it is a good idea to read through the instructions a time or two to familiarize yourself with the assembly steps.  Before you do that, you may want to wash the resin components to rinse off mold release agents and read at your leisure while the parts dry.  Dawn dishwashing detergent is frequently recommended, because it does not contain oils or additives such as lanolin that can cause issues when painting. Shout is used by some. You want a product that will clean off the parts without leaving its own residue behind.


I used a plastic food take out container and a soft bristle toothbrush to gently clean all the resin parts thoroughly before rinsing with cool water.  Then I patted them dry with paper towels and set them aside to finish air drying while I read over the kit instructions.  Now is the time to be sure you have any needed parts that are not in the kit, or to plan for substitution of kit parts if you wish.  Common examples are brake components and ladders.  I will point out several examples as the kit build progresses.

First off, I needed to get trucks, which were not included.  My research online indicated that most of the X37 cars were equipped with PRR 2D-F19 coil elliptic trucks, as mentioned in the previous post. In HO scale, there are examples of similar trucks available from Tichy and Bowser.  It seemed to me that the Bowser 40194 PRR coil semi-elliptical freight trucks had an appearance closest to the prototype, so I ordered a set.

I model 1965, so I also needed to consider the appearance of theses cars in my time frame.  The decals in the kit were for the as built Circle Keystone lettering scheme.  My research indicated that the cars had been repainted in the Shadow Keystone scheme by my modeling year.  Microscale offers a decal set 87-1201 that should provide what I need, and was ordered.

Once the major kit parts had dried, I inspected the body for flash (excess resin from the molding process).  This carbody has a fair amount of flash, including 32 “vent gates”, which are small rectangular tabs around the inside of the body near where the floor fits, as shown below.


Click to enlarge

These all have to go. I had not seen this before in other resin boxcar kits in my stash so was a bit confused at first. Some friendly folks at resinfreightcarbuilders.groups.io , an online modelers group, confirmed that I did indeed want to trim these nubs off so that the floor will fit. After a bit of pondering, I decided to use a micro saw and nippers, followed by chisels and sanding.  The JLC micro saw and Xuron sprue nippers did a nice clean job with the bulk of the gates.


You will note the N95 mask, which is good practice to wear when producing resin dust, as it can be an irritant and even toxic if inhaled in significant amounts.  The trimming was followed by my 2.5 mm wide Godhand chisel blade in a short handle to shave down most of the remaining material.I have written about this tool previously. You can find that post using the keywords on the sidebar.  This is one of my favorite tools, very versatile, with a range of chisel shapes.


Final clean up of these gates and the other thin flash on the sidesills was done with a #11 Exacto blade and several sanding sticks, ranging from 240 to 600 grit.  This work required patience and use of a magnifier to be sure it was flash and not part of the body being trimmed. The body cleaned up nicely.  I was pleasantly surprised in working with the resin material. In some ways, it seems more workable than styrene.  I did end up with a small notch in one of the side sill tabs, whether from an errant chisel or exposing a bubble in the resin, I do not know.  Squadron Green putty was used to fill it, followed by sanding once cured.

Shaving with chisel and sanding in progress

Once the gates were sanded smooth, it was time to check the fit of the floor.  It is not uncommon for resin floors to require sanding for length and/or width.  In some cases, the floor might be short, but more often it can be slightly long, as in this kit.  I used 240 grit sandpaper taped to my workbench to gradually and carefully sand the sides and ends, checking frequently for fit and squareness.  A piece of glass to tape my sandpaper to would be a good addition for my workbench.  Wear a mask during sanding to avoid inhaling resin dust.


You can see the mustard colored sandpaper and the green tape below the model.  I checked fit after a few swipes repeatedly until the floor was a tight fit.  My carbody is bowed inward slightly so I gently slid the floor in from one end.  Bowing or warping is another common challenge with resin kits.  My next post will discuss this and how I dealt with it.

Sunday, August 8, 2021

The Right Tools

 It is sometimes amazing what a difference the right tool can make.  While growing up, I learned a lot about hand tools for basic carpentry, plumbing and yard work from my dad and grandfather.  Using the "right tool for the job" was a mantra that many of you have likely heard and a lesson I absorbed early.  

When I was getting into model aircraft building as a teen, I started out with just a few basic tools, including an Xacto knife, paint brushes, household tweezers and toothpicks.  Soon, my developing skills were bumping up against the limits of my tools.  My grandmother lifted my modeling to the next level by introducing me to Brookstone, which at that time was a mail order catalog house that offered garden and hobby tools.  She would periodically ask me to pick out a tool from their catalog and would order if for me.

The tweezers and clamps from Brookstone in this photo are on my workbench to this day, more than 40 years later, and still help me regularly.


I have continued to add useful tools to my kit, with recent additions of specialized precision pliers and chisel sets.  I will cover the pliers in more detail in a later post about bending wire for details.  The modelers chisels have made a step change in my modeling, both from a level of detail and confidence perspective.  Here's the first modelers chisel that I acquired a number of years ago.


Micro-Mark Modelers Chisel #80893

This chisel, sold by Micro-Mark, has a very sharp hardened blade that is 4mm wide, with rounded edges.  I have found this much superior to an Xacto No.17 blade for removing cast on details, or smoothing out ejection marks.  The tool has a substantial weight and a ridged gripping surface, both of which provide good control.  It works well to remove cast on grab irons and other details from flat surfaces with less tendency to dig in or skip versus the No. 17 blade.  In some cases, however, this chisel is too big and it is not ideal on curved surfaces.

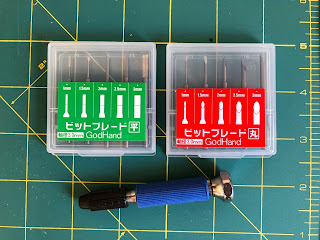
A recent post on Ted Culotta's Prototype Railroad Topics blog introduced me to another option for chisel blades.  I had been looking for narrower chisels with a shorter handle to use in tight spaces, and had considered a variety of options from several manufacturers that other railroad modelers had recommended.  Once I saw Ted's review of the GodHand chiseling tips, I decided that they looked like just what I was searching for, so I ordered the round and flat blade sets shown here (Ted also reviews some other modeling chisels that he uses in the link above) .


GodHand Flat Blade (green) and Round Blade (red) chisel tip sets
GodHand Power Pin Vice below

Both sets include five tips with widths from 1mm to 3mm.  The flat blade set is item code GODGH-BBH-1-3, the round blade set is item code GODGH-BBM-1-3.  Each set come in a sturdy plastic case that holds the bits firmly.  Be aware, these are very sharp!  The base of these tips is 3mm in diameter, and is designed to fit into a pin vice or similar holder.  Be sure your pin vice collet can accommodate the 3mm diameter.

I also purchased a GodHand power pin vice, item code GODGH-PB-98ST to hold the chisel tips.  I was concerned about my other pin vices being large enough for these tips, plus I really wanted a more substantial high quality  pin vice, and this one certainly meets those requirements.  It has a soft rubber grip, a good weight, and a spinning top.  The pin vice is well made, with a very nice blackened knurled steel cap and a precision steel collet.  The collet will tightly grip tips or drill bits from 1 to 3.2mm diameter. I like the short length of this tool for precise control and the ability to work in tight places on my models.  Other versions are also available.

These are available from HobbyLink Japan as well as other sources, including Amazon.  GodHand makes a variety of modeling tools, with many different chisel tip sets.  I found the ordering process and service from HobbyLink Japan to be very good, with reasonable and fast shipping as well.

I have been using these chisel tips with great results working on both flat and curved surfaces, such as in between the corrugations on box car ends to remove material with good control.  This photo shows use of a rounded tip on the end of a Tyco gondola where I have removed the cast on brake housing.


The rounded tip is ideal for working in this area, following the curves in the plastic.  Combined with the sharp working surface, it provides excellent control.  In a later post I will describe my kitbash of this "toy train" gondola into an accurate representation of a Texas & Pacific steel gondola, greatly helped by this superb tool.

I'm grateful for the skills my father and grandfather taught me, and for the appreciation of fine tools they, and my grandmother, fostered as I was growing up.  Having good tools that are "right for the job" increases my enjoyment of the hobby, and allows me to accomplish a higher level of modeling.

Seize The Day

 You have probably heard this phrase before, whether it was in a movie ,  song lyric , or advice from someone, perhaps a teacher or mentor. ...