Showing posts with label Detail Parts. Show all posts

Sunday, August 10, 2025

Seize The Day

 You have probably heard this phrase before, whether it was in a moviesong lyric, or advice from someone, perhaps a teacher or mentor.  The original Latin phrase “carpe diem” literally translates to “pluck (or harvest) the day.”

In any case, the expression is often used to suggest that we do not wait, but rather do the things we want now rather than later.  Take action, enjoy life, make a move while we can.  In the railroad modeling hobby, many of us can relate to delaying our dreams or hobby aspirations due to other priorities in life, only to find that opportunity has passed us by.  In the larger sense, this might be health, vision or fine motor control or resources.  As I approach retirement these factors are coming into focus (pun intended).  Fortunately, I am still physically able to perform, and even improve on, the skills for detail work on HO scale prototype models and also am fortunate to have the resources to (usually) obtain what I want, for the time being anyway.

Currently I have accumulated much more than I have built in terms of models, adding many “to be built” kits and detail parts to my stash over the last few years. In some cases, these are limited release or out of production craftsman kits that have been “seize the day” purchases.

The Kit “Stash” (most of it)


 A lesson learned over the years, especially as my interests have narrowed while becoming more knowledgeable, is not to wait when it comes to purchasing items that are real priorities for my interests.  Many of these are produced by cottage industries, small suppliers who have a passion and the skills to manufacture kits or detail parts that may have a very specific, narrow application, but also often only produce for a relatively short period of time.  This might be a unique, signature car for a particular railroad or an uncommon detail, such as a type of freight car truck or door that was not so widely used. 


Examples of Out of Production Detail Parts

 Archer  resin printed surface details are once again available, after a short hiatus when the original owner sold the business, leading to much angst in the prototype modeling community.  This seems to be much more the exception than the rule, however, given the hurdles of finding a buyer for a small scale business.

I was reminded of this just this morning, when I learned of the closure of Custom Model Depot, which stopped producing last year. This family run business offered a range of 3D printed model railroad items, including the Dalman Andrews trucks pictured above.  In this case, I did purchase several sets of these when they were announced, since they are a “signature” freight car truck for the Great Northern. The business closed due to demands of work and limited free time. 

Running a business is challenging, requiring a great deal of effort, time and money.  For hobbyist type producers, unless a large established manufacturer with a range of items with broad appeal, their enterprise is frequently a labor of love as opposed to paying the bills.  As a result, burnout, everyday life or changes in circumstance play a part in the short life of many suppliers.  Some do last, but even so their products are commonly limited production runs.  All the more reason to seize the day when possible.

In the event one misses the original availability of a limited run kit or other item, not all hope is lost.  In person swap meets and online marketplaces such as eBay, or forums like HOSwap on IO , as well as specialty online retailers, can be viable sources of out of production items.  

Examples of Out of Production Kits Sourced Online

Patience is a virtue when seeking out a specific car or other item of interest that is no longer manufactured, unlike the near instant gratification of buying when a kit is first available. It can take months, even years, to find something that is long out of production.  I have learned to ask around in the modeling community, as you never know what someone else has in their stash that might be just what you want. In some cases, trades can be worked out that benefit both parties, allowing us to get value from our surplus.  Learning how to set up targeted saved searches on eBay is another way to hunt for a sought after item.

Successful Search Finds

The warehouse kit and the “Roof Topper” shown above are both the result of literally multi-year searches waiting for these items to show up from a seller.  In each case, I had seen these advertised when they were first offered, but put off buying for one reason or another only to find that the manufacturer had shuttered operations when I finally had the resources to move ahead. Scouring hobby shops and swap meets was fruitless, but online searches finally paid off after a few years. The waiting does ensure that the sought after item is REALLY wanted.

The New Rail Models Bingen Loading Warehouse is a unique signature structure on the SP&S (now BNSF) rail line through the Columbia Gorge in Washington state and fits with my time period and wood products focus. I have driven by the actual warehouse in Bingen while traveling on Highway 14 through the Gorge many times. While the model is selectively compressed, it captures the unique look with curved roof and large exposed tresses.  Perfect for a loading siding with stacks of plywood or lumber and offering a good reason for all the double door box cars in my stash!

Seeing the Great West Models Roof Topper ads years ago inspired an idea for a small chemical plant scene with a distinctive but relatively common arched industrial roof shape, particularly in the coastal Northwestern US, where abundant rain makes flat roofs problematic. Again, this is a roof style I have observed frequently in work travel over the years.  These roof moldings were offered in several sizes intended to modify several different common HO building kits.  The one I sought is for the City Classics Carnegie Street Manufacturing building kit, adding visual interest and a change from the standard look.  Many pulp and paper mills in the Northwest had small specialty chemical manufacturing operations associated, as I have discussed before https://olympicpeninsulabranch.blogspot.com/2025/03/prototype-inspiration-chemicals-and.html  More reason to build all those tank car kits I have been accumulating.

I have had similar success searching for out of production freight car kits that caught my interest or filled a specific desire, often after significant time waiting.  With  time and searching it is possible to locate that prize you missed the first go round in many cases. There are still a few on my list!  The easiest and quickest path though is to pluck the day when you first see that beauty you want, if it fits your budget.

-Carpe Diem

Sunday, December 22, 2024

Resin PRR X37 Build, continued

 Continuing with a detailed step-by-step description of this resin boxcar build.  The trucks and decals I ordered for this project arrived, as well as some 1/4 ounce wheel weights.  The photo below shows these and some other details that I intend to substitute for, or add to, kit furnished items.


From left to right, a Tichy AB brake set will be used for the underbody brake detail, 1/4 ounce stick on wheel weights as needed on top of the floor, will likely use a Detail Associates Equipco brake housing (#12 on sprue), Branchline 7 rung ladders are a close match for the prototype after being cut down to 6 rungs, and a Kadee Equipco brakewheel is in the upper middle.  The Bowser 2D-F15 coil elliptic trucks with steel wheels per my research, Yarmouth #220 etched brass sill steps for GSC tank cars will be modified for the corner sill steps, and Microscale set 87-1201 for the lettering with Shadow Keystone heralds round out most of the major enhancements.  I realized after the fact that I did not include the airhoses and brackets from Hi-Tech Details or the coupler lift bars (Tangent) in my photo.  

I have not yet decided whether I will use the resin “wood” running board from the kit, or substitute a Yarmouth laser cut wooden running board set.  In addition there are a few other items such as bracket grabs (Kadee or Red Caboose) and wire that will be used.  More description on these as I progress.

In my last post, I had test fit the floor into the one piece resin body after some careful sanding on the edges of the floor casting.  The fit is very snug and I was concerned about pressing the floor all the way on.  It was suggested that I drill and tap the bolsters for the trucks so that the screws could be used to help remove the floor.


The first step in doing so was to measure and locate the centers for drilling the bolsters using a small metal rule to check from side to side, verifying that there was equal material on both sides of the centerline, then marking the middle with a pencil.  The bolsters should be 5 scale feet from the end of the car, hopefully in the middle of the kit bolster.  After using a sharp probe to make a dimple, a #50 drill was used to drill through the bolster and floor, cleaning out the resin spirals as I went.  This was followed by tapping for a 2-56 screw.  The resin is soft enough that no lubricant was needed.


This photo also shows the Kadee #78 couplers and near scale draft gear boxes that will be used, although I will wait to mount these until after everything is set with the floor fit . The mounting lug at the back of the box will be removed and I will also check the coupler box overhang at the end of the car to reach six scale inches. After tapping the bolsters, I temporarily installed 3/16” long 2-56 screws so that I could continue with my floor fit check.


Putting the floor back in, I discovered that it is still just slightly long and will need more careful sanding to reduce the length, as you can see on the left side in this photo.  The floor width seems just right.  I also noted that the floor fits just too deep into the body on the right.  On the left side additional checking shows that it is about right when the floor is fully engaged on that end.  I may shim the right end to bring the floor closer to flush with the sides and end of the body.  

That’s my progress for now, and with Christmas upon us, will take this back up at the end of the week for my next installment.

Wednesday, April 6, 2022

Tale of The Tardy Tank Car

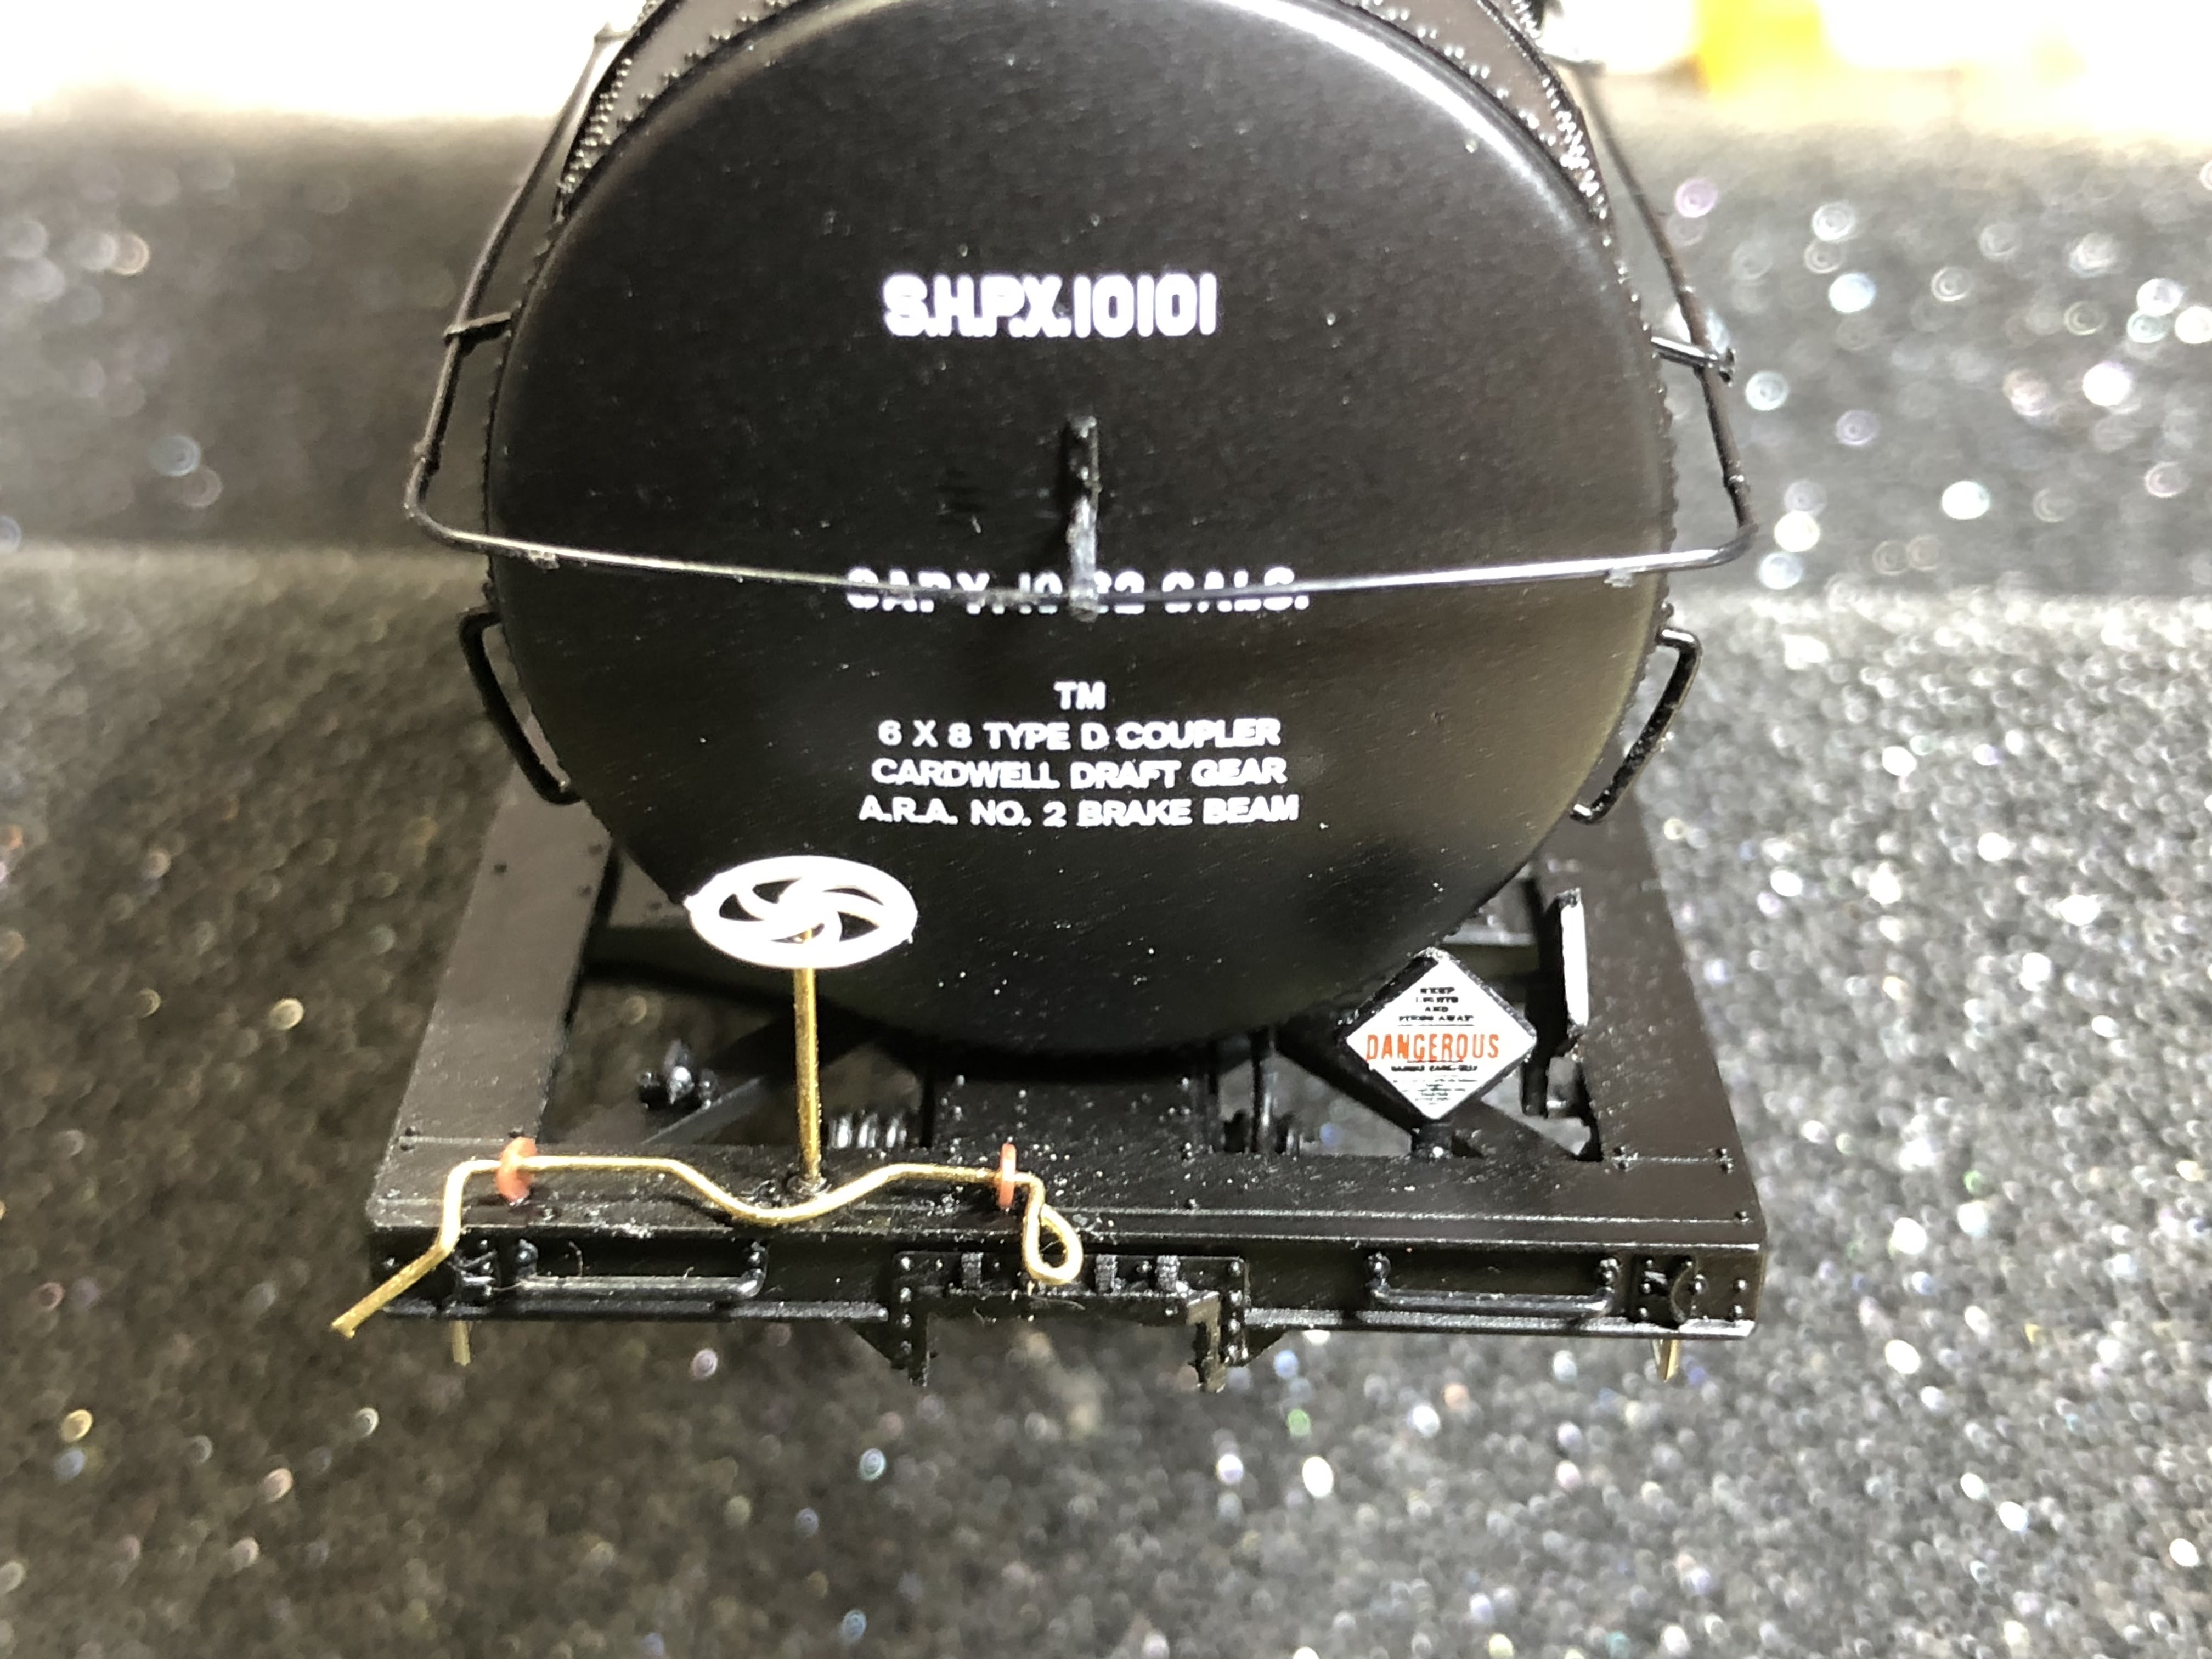
 There is a tank car on my workbench which seemed to have taken up permanent residence in a partially finished state until just recently.   I would pull it out, fiddle, ponder and slide it off to the side, having made incremental progress at best. I allowed contemplating some of the finer details to intimidate me until finally pushing through those challenges and finishing assembly last month.  Here it is now, just needing a coupler, the trucks mounted and a little touch up paint.


The model is a Proto2000 10,000 gallon Type 21 riveted tank, with nice detail and paint, including very fine printing. When I purchased it, I was taken with the binary road number 10101, and can always put  a plain black tank that could carry a variety of liquids to good use serving the mill. 

It built into a fine looking model, although there are some fiddly bits, particularly the tank band ends, and the hand rail around the tank.  These finally submitted to gel CA to help tack them in place.

While finishing the model was done at county road crew pace, I did take the opportunity to replace a few detail parts with wire and etched metal replacements for durability, and practiced my wire bending skills.

Last month I shared a wordless photo of the brake wheel end of this tank car after completing what was supposed to be the last detail.  Did you spot my mistake?

Unfortunately, in my excitement about finishing, I glued the brake staff and wheel in place with the coupler lift bar flipped back.  Due to the design of the lift bar with a curve to fit around the brake staff, it was trapped out of place 🤬.  Stepping away from the workbench, and handy implements of destruction, I calmed down and thought through how best to fix my goof. Remove the brake staff or the lift bar attachments?   I decided to remove the lift bar by cutting off the Tichy styrene eye bolts.  This then required drilling out the pin of the eyebolt left behind in the end frame so I could replace them.  I had wanted to try the Tichy eye bolts I had on hand and they do look nice.  It was also probably easier to replace those than it would have been to remove wire ones. Here is the final result.


Tichy .0125 inch phosphor bronze wire was used for the cut lever and .015 for the brake staff, with a Tichy brake wheel.  The kit styrene brake lever part was used as a template for bending the wire.  The A end lever is similar, without the curve to fit around the brake staff.  Bending the wire went well using several specialty pliers.  I have a small pair of chain nose pliers (red handle in photo below) that work well for tight curves.  The sharp angles were accomplished with Xuron 575 micro bending pliers along with their 450 tweezer nose pliers for holding (blue handles in photo below).


I also upgraded he kit provided sill steps with very fine looking etched metal ones that Yarmouth Model Works made specifically for this kit.  These add on details will get brush painted after cleaning with alcohol on a cotton swab to remove oils.


One other lesson learned was to consider replacing kit furnished styrene brake rods with brass.  I had already built the underframe per kit instructions early on and ended up breaking on of the brittle brake rods during handling in a later assembly step, so replaced one section with wire. I may end up replacing more.


All in all, a positive experience and a sense of accomplishment in getting this model out of the shop. Once painting is finished.


Saturday, August 7, 2021

Underframes (or Dipping Your Toe In)

 I don't know about you, but sometimes just contemplating taking that first step is the most difficult, like going to a lake or beach and standing on the shore, working up the nerve to get into the water (up here in the Northwest we know it is going to be cold!).

A few years ago I was at that point when it came to adding underframe details to my models.  I had read a lot of information, digested many "how to" articles and educated myself on prototype practices, but I was hesitant to give it a try for fear of "messing it up."

After a little internal pep talk ("you can do this", "how difficult could it be?", "it's just one model, right?"), I decided to dip my toe in, starting with a Red Caboose flat car model decorated for the Great Northern that came with older KC style brakes.  I wanted to update the brakes to fit my modeling period of 1965, so I substituted Tichy AB brake components, using a few small pieces of styrene to provide mounting for the brake reservoir and remembering to align the brake cylinder actuator toward the "B" end of the car.  I also painted the underframe and weight which forms the "floor" with grimy black from an aerosol spray can, or rattle can.


Red Caboose Flat Car Underframe with AB Brake Components


The results of even this small effort looked better than I had expected. With that first little step behind me I felt ready to jump in, this time adding brake rod detail to an Accurail underframe.  


Details Added to Accurail Underframe


Once again I used Tichy AB brake components, fabricating brake levers from styrene strip, and using wire grab irons as the hangers.  Dimensions were based on reference information and hand trimmed to shape with an Exacto blade.  I also added a train line (you can see it crossing through the centersill), along with brake rods from bronze wire.  The layout is generic and not necessarily 100% prototypical for a particular car, but a reasonable appearance.  Here is the result after painting with flat grimy black.


Detailed & Painted Underframe


Looking at it today, I know it is not completely accurate.  There is no chain between the brake cylinder and the lever.  I also could have added the piping between components for more realism, but the level of detail I did add really looked good.  One take away after I test fit trucks:  the wire brake rods probably need to terminate closer to the centersill as they may interfere with truck swing.  But, hey, not bad for a first attempt!

I'm now considering this my typical minimum level of detail for underframes.  There are a few other details I will add, like air hoses and coupler cut levers.  As a next challenge in building my skills I may try adding brake piping to a few cars.  Turns out the water is fine - I know that I can do this and it improves the appearance of my models, plus it is actually fun.

Friday, July 16, 2021

Successive Approximation

 We are fortunate to live in a time where very accurate railroad models are broadly available, whether in kit form or ready-to-run, in many scales and for many eras and railroads.  This may be most true for HO scale, where some amazing models are being produced for us to enjoy.

While I enjoy building models and am working to further develop my modeling skills for adding accurate details, there are times where models that are fully assembled and ready-to-run, or nearly so, catch my eye and my wallet.  An advantage of this is that my fleet of rolling stock has grown with some beautifully produced cars that can immediately be admired and eventually run on the layout.

These three Great Northern caboose models are meant to represent steel wide vision caboose designs from the 1960's and are an interesting example of the evolution of ready-to-run plastic models.


Athearn & Atlas Models
(click to enlarge)

The model on the left above is a custom printed Athearn model that was once produced by Track One from the Athearn wide vision caboose.  Track One has a Facebook page and may still be doing business, although the last post is from 2019.  While the model itself is not highly accurate for GN (the model is closest to a Rock Island prototype), the printing is well done, including the signature GN safety slogan, but without the "radio equipped" lettering.   The X-101 was a wide vision caboose built by International Car for the GN, so the general appearance is similar., although a third side window is lacking.

This model is what many would call a "stand in" due to some non-prototypical design features.  I have added more appropriate trucks with metal wheelsets and Kadee 58 knuckle couplers.  It really isn't bad for an Athearn blue box model with molded on details like the curved grab irons, but does lack GN specific details.

On the right is the Atlas version of a GN standard vision steel caboose.  Note the difference in the width of the cupola.   This model is closer to the actual cars that the GN ordered from Morrison International in 1963 and 1964, but still not exactly prototypically accurate.  Unfortunately the silver roof color is incorrect.  This car came with steel wheelsets and knuckle couplers.  It is lacking the GN tool and battery boxes on the side, and the unique GN end gates, with minor differences in the side window arrangement, among a few other details.  Again, beautifully painted and printed with crisp lettering and it has separately applied wire grab irons.


Walthers Mainline Model

The recently released Walthers version of the Morrison International caboose is very nearly accurate for the GN right out of the box, with just a few specific details that could be added.  The window arrangement is correct for the GN.  Interestingly, as this is a Walthers Mainline model, it does not include any grab irons.  They are available as an add on detailing kit, however, and there are molded drilling dimples on the car to help in placing them.  I have not yet installed these as I just recently got this car.  It does include the distinctive GN tool boxes and end gates.  Unfortunately, Walthers quickly sold out of this car decorated for GN.  I was able to find one available from a dealer online after finding that my pre-order through another dealer was not fulfilled by Walthers.


Atlas, Athearn and Walthers Ends
(click to enlarge)

The end view shows some of the differences, with only the Walthers model on the right having the correct end gate, although no GN Rocky logo.  This model also has the smoke jack correctly placed, unlike the others.

It isn't a major challenge to add to or modify these to better represent the actual GN caboose they each represent.  For example, adding the tool boxes and end gates, a firecracker radio antenna to the cupola, perhaps decal additions where appropriate, preferred couplers (Kadee scale head are my standard), are all relatively simple changes to improve on the existing level of detail.

I like each of these models and they graphically illustrate the progression of ever more accurate mass production models that are being produced.  There may never be a "perfect" exactly prototypical model with every detail and feature replicated but the standards seem to continually improve.


Sunday, July 11, 2021

The Current State

 A popular phrase used in business these days is "current state," which refers to where the organization, or a particular process or practice in that organization, is now: the situation as it currently stands.  Defining the current state is usually step one in considering where the organization wants to get to.

In the case of my modeling and my model railroad, this is my current state:


Workbench (click image to enlarge)

My work area is well set up for my purposes, consisting of an old stamped steel topped wooden table with self-healing cutting mat and cardboard on top, a swivel arm lamp, soft jaw swivel vice, foam cradle and sheets for model work without damaging paint or details, and flat tile pieces for cutting and glue puddling surfaces.

The small drawers hold small detail parts like grab irons, ladders, rivets/nbw, brake wheels, couplers and screws, while the larger plastic drawers primarily hold tools, small clamps and jigs.  The ceramic mugs are convenient holders for frequently used tools.  Adhesives and the like are readily at hand.

Yes, I am a tool guy.  Jack Burgess has written extensively in Model Railroad Hobbyist and elsewhere of his appreciation for good tools and a plentiful variety of them, and I am an eager disciple of that philosophy.  The two blue handled Xuron specialty pliers sitting on the bench are recent purchases.  Future posts will indulge my interest in useful specialty tools of high quality, while rationalizing that tendency by demonstrating how it has improved my modeling.

Two in-progress models are on the bench; a Proto 2000 tank car nearing completion in a foam cradle, and an Intermountain Milwaukee (MILW) 40 foot box car.  I tend to work in bursts, completing a step or two on a model, then working on another while glue dries or creative energies are replenished.  

Not shown are additional detail parts stored in small plastic totes under the workbench, and a variety of styrene and wire in the desk drawer, along with measuring and drafting tools that come in handy.


Current Layout "Status"

The layout, on the other hand, is not as "developed" as the modeling workbench, as shown above.  The sheet of 2" blue foam was purchased some time ago, but has languished on the opposite side of the room from my workbench with no progress to speak of.  This will be the surface of the shelf layout, to be supported by future benchwork, possibly Ikea shelving.  Various other "supplies" and rolling stock (kits and RTR) are stored in boxes.  The plastic wrapped dark green material is fibrous furnace filter mats for evergreen trees, while another box holds scenic materials such as ground foam and some readymade trees and brush.

The goal is to work on the first shelf module during the rest of this year, even if it becomes a "practice" layout that gets reworked later.  I've procrastinated this step long enough.

I'm itching to put those completed models and sound equipped DCC locomotives on a track so I can advance the throttle and move a train, even if just a few feet.


Merry Christmas!