
Friday, December 31, 2021
Saturday, December 11, 2021
Drill Bit Organizer Review
I have been looking for a drill bit organizer for awhile now. As I start to build more craftsman type kits, including resin and kitbashes, the need for more, and a wider variety of , drill sizes has made me realize that my current single container for bits is inadequate. Not only is it too small but it necessitates measuring the bit diameter with calipers when a bit is changed. This was not a major issue when only using a couple of sizes that could be left in the pin vices, but it is a major inconvenience when drilling a larger variety of hole sizes. In addition, I had need of more bits to replace broken ones.

Small Bit Storage Container & Pin Vices
Another popular storage organizer is a flat plastic case with a clear sliding lid, having individual slots for each size from #61 to 80. Again, it is intended for one of each size, although the flat design is compact and easily stored in a drawer. Unfortunately, it appears this may no longer be available, at least from the sources such as Micro-Mark that I have checked.
A third organizer is a metal case with a lid and flip up holder for the bits, a miniature version of a design that has been in use many years for larger drill bits one might have in their tools at home or work. These seemed clunky and not very practical to me.
Some organize their small bits in small individual envelopes or resealable plastic bags, even plastic pill bottles.
I was searching for a solution that would store multiples of each bit size, be easily accessed, and sturdy. While looking for some good quality drill bits at Otto Frei, a jewelry supply company, I came across a 3D printed drill bit organizer and dispenser made by Nashef Designs. The design was intriguing and looked like it met my needs. Even better, Otto Frei had a bundle that included the organizer, either 5 or 10 of each bit size, and a bonus tube of cutting lubricant. I decided to purchase the "Basic Kit" with 5 of each size from #51 to 80 (150 bits total). The cutting lubricant has already been put to use in tapping holes.

BORE (tm) Drill Bit Organizer
The organizer is very cleverly designed, with 32 compartments that are labeled with the bit size. The top rotates with a distinct click between each compartment, allowing easy access to one size. Clear windows on the side provide a visual check of the compartments. This organizer holds a wider range of bits than most, from #51 to #80, with an extra compartment, and a closed position.

The resin material it is printed from seems durable, almost like a nylon. Typical for 3D printed items, there are striations or small ridges on the material that are artifacts of the printing process, although the markings for each bit size are very clean edged and easily read. The overall size may be a bit large for some at roughly 4 inches in diameter and a similar height, but I appreciate the design and storage capacity, along with the clearly indicated bit sizes. It has found a home on top of a storage bin on my workbench. The tube of lubricant fits in the center hole, keeping it handy.
One observation so far is that it can be a bit tricky to get the smallest bits out of the organizer. Because it is designed for #51 size and down, the compartments are tall and the small bits, #74-80 in particular, will sometimes catch on the striations inside the compartments or get lodged at an angle. I have found that a long pair of tweezers can be a help to grabbing one of the tiny bits and pulling it out. It may be that using a small wood stick or wire with a little piece of tape or a dab of a tacky glue might serve well also.
The organizer itself is available directly from Nashef Designs, but I recommend checking out the kit options at Otto Frei, as the price including the bits and lubricants is a good deal. I am not sure how often I will use the larger bits in this set, but even so, the pricing is good on a per bit basis.
Otto Frei has been recommended by several people in various online groups as a source of quality tools such as tweezers, pliers and cutting tools, as well as good quality high speed steel (HSS) drill bits.
Wednesday, October 20, 2021
Wednesday Wanderings - Tank Car Edition
Travel, whether for work or pleasure, can sometimes provide an opportunity to find and photograph interesting railroad subjects. In this Wandering, I share a few tank cars that could have been in use during the period that I model, and which offer interesting details for reference in modeling.
This first tank car was located at the Marias Museum of History & Art in Shelby, MT. My wife and I were attending the Great Northern Railroad Historical Society (GNRHS) convention held at Glacier National Park in 2010. One of the activities offered was an all day bus tour to several locations along the BNSF (former GN) line, including a stop at this eclectic museum, which had a caboose and tank car alongside a collection of antique farming equipment.

I have not been able to determine the origin of this car, which has reporting marks USA 19049. The other lettering was too faded to read, so I do not have many details. The car is sitting on a very nice set of Andrews trucks and easily accessible on all sides for photos. I won't overwhelm you with all of them, but this next photo shows an interesting lever hand brake and some of the rivet detail clearly.

Further back, my work regularly called for driving trips to Eastern Washington, including the Richland - Pasco - Kennewick Tri-Cities area, which is the location of the Department of Energy's Hanford Site, which was the Manhattan Project site that produced the majority of the plutonium used for nuclear weapons beginning in WWII and ending in 1987. Pasco is also the location of a major rail yard that was once owned by the SP&S Railroad and which still serves the BNSF today.
Behind some warehouses that date back to the WWII era and are now an industrial park, there is a collection of vintage railroad equipment, both freight and passenger, that is openly accessed.

This welded ICC 103-W tank car built by GATC in August 1949 is one of the pieces of rolling stock there. The stenciling notes that the tank is Saran lined, likely for corrosive chemical service of some kind. Original reporting marks were painted over, and the number HO-10H-3686 is not one I have identified.

This photo is a close up view of the double shelf coupler on the brake end of the car. This type of coupler is relatively newer than the car, and is designed to prevent another car's coupling "riding" up or under the tank car coupling and possibly puncturing the tank in a derailment. From other stenciling on this car, it appears that it may have been in use until the mid 1990's, which could explain why this coupling was retrofitted. Note the air brake hose detail also.

Here's one last tank car view to finish off our Wandering this week, this one also taken in Pasco on the same trip in 2005. This is a riveted car, built by AC&F in January 1941. Unfortunately I did not get a clear picture showing the type of the car, but it has an unusual large platform around the dome. My guess is this was added some time after the car was built, as it still has a small side platform below the dome on this side that appears to be original. Again, it seems this car was in use into the 1990s.
Tuesday, October 12, 2021
Forest Products as Traffic
Earlier I mentioned that forest products are a primary focus of my layout interests. This interest is expressed not only by my decision to model a paper mill as the central industry on the layout but also in the revenue traffic that the Olympic Peninsula Branch will carry and, necessarily, the types of freight cars needed to handle this traffic.
The inclusion of appropriate loads on various types of freight cars is a great way to increase the variety of industries served, implying their existence off "stage" as they feed traffic to the portion of the railroad modeled on the layout.
The Great Northern, like many Western railroads, depended heavily on forest products for revenue. Advertisements and other GN publicity materials illustrate this well.
This one, showing rolls of paper coming off of the finishing line at a paper mill:

1959 magazine ad - author's collection
Another discussing transport of logs and lumber, as well as promoting the railroad's efforts in developing industrial land for forest product manufacturing:

1957 magazine ad - author's collection
The boxed text in the center of this ad points out that the railroad not only transported forest products, but also consumed them for their uses, such as with ties for track. Yet another source of loads for freight cars, in this case for company service and maintenance-of-way efforts.
Going into more detail, company publications provide interesting background and examples of car loading for various wood products.

from Talking it Over, GN employee publication
March 1965 - author's collection
This short article includes very helpful detail photographs of several different plywood and lumber loads on bulkhead flat cars, which were fairly recent developments in the mid-60's. It is interesting to note that full and partially wrapped as well as unwrapped loads are all shown. This is a period where shippers were transitioning to new types of cars as well as new means of protecting their products from the elements. Previously, much finished lumber was shipped in boxcars, laboriously loaded by hand, as well as on standard flat cars, particularly rough lumber. In some cases, gondolas were also used. The desire for faster loading of larger loads, and for protection from the elements, was driving change in the railroad practices at this time.

Great Northern Goat, publicity publication
June 1965 - author's collection
This article in a monthly GN publication highlights a new customer for the railroad, a plywood mill in Montana. The bottom photograph of a box car with the iconic standing Rocky goat logo shows forklift loading of plywood into what appears to be a double door 40' car. This car would have been in my favorite glacier green color, a very signature car for the GN and one that sparked my interest in the Great Northern as a kid.
Lumber mills, plywood plants and logging are all typical of the forest product customers providing loads that were a mainstay for the GN and for my model railroad. Other loads that would be common include telephone poles on flats or gondolas, often very long and requiring idler flat cars; cedar shakes, woodchips and boxcars with paper products inside.
There is another entire set of loads and cars involved with pulp and paper mills, with a variety of tank cars handling chemicals, additives and byproducts. These are deserving of a much more detailed treatment in a future post.
As I have been building my model freight car roster, it has been helpful to look at available information like the advertising and promotional materials above, as well as period photographs, traffic reports and equipment rosters. These have shown the variety of flat cars, gondolas and box cars used for forest products by the GN and sister railroads in the Northwest.
I plan to highlight these various car types in more detail, along with their loads, in the coming months.
Wednesday, September 22, 2021
Wednesday Wanderings
A few years ago, my wife and I were walking the beautiful riverside trail along the Columbia River in Vancouver, Washington. One of the access points for the trail is next to a business park, the Columbia Business Center, that stands on what was a Kaiser shipyard during World War II. Some of the shipyard buildings still exist along with many modern commercial and industrial buildings. This area is rail served by a short spur off of the BNSF main line that also runs along the river and through downtown Vancouver.
The BNSF trackage was once the SP&S main line along the North shore of the Columbia River, and I've spent many enjoyable hours railfanning at various points along those tracks. The spur in the business park serves several businesses with occasional box cars of various commodities, covered hopper cars for a plastics manufacturer and flat car loads of steel for fabricators and some ship building.
During our visit, we happened on three neat switchers sitting idle on a siding next to one of the buildings.

photos by author

This neat little critter, CBCX-103, is a GE 25 ton industrial switcher that was built in 1942 for Kaiser Shipyard. You can see how diminutive it is, nestled up against this next locomotive.
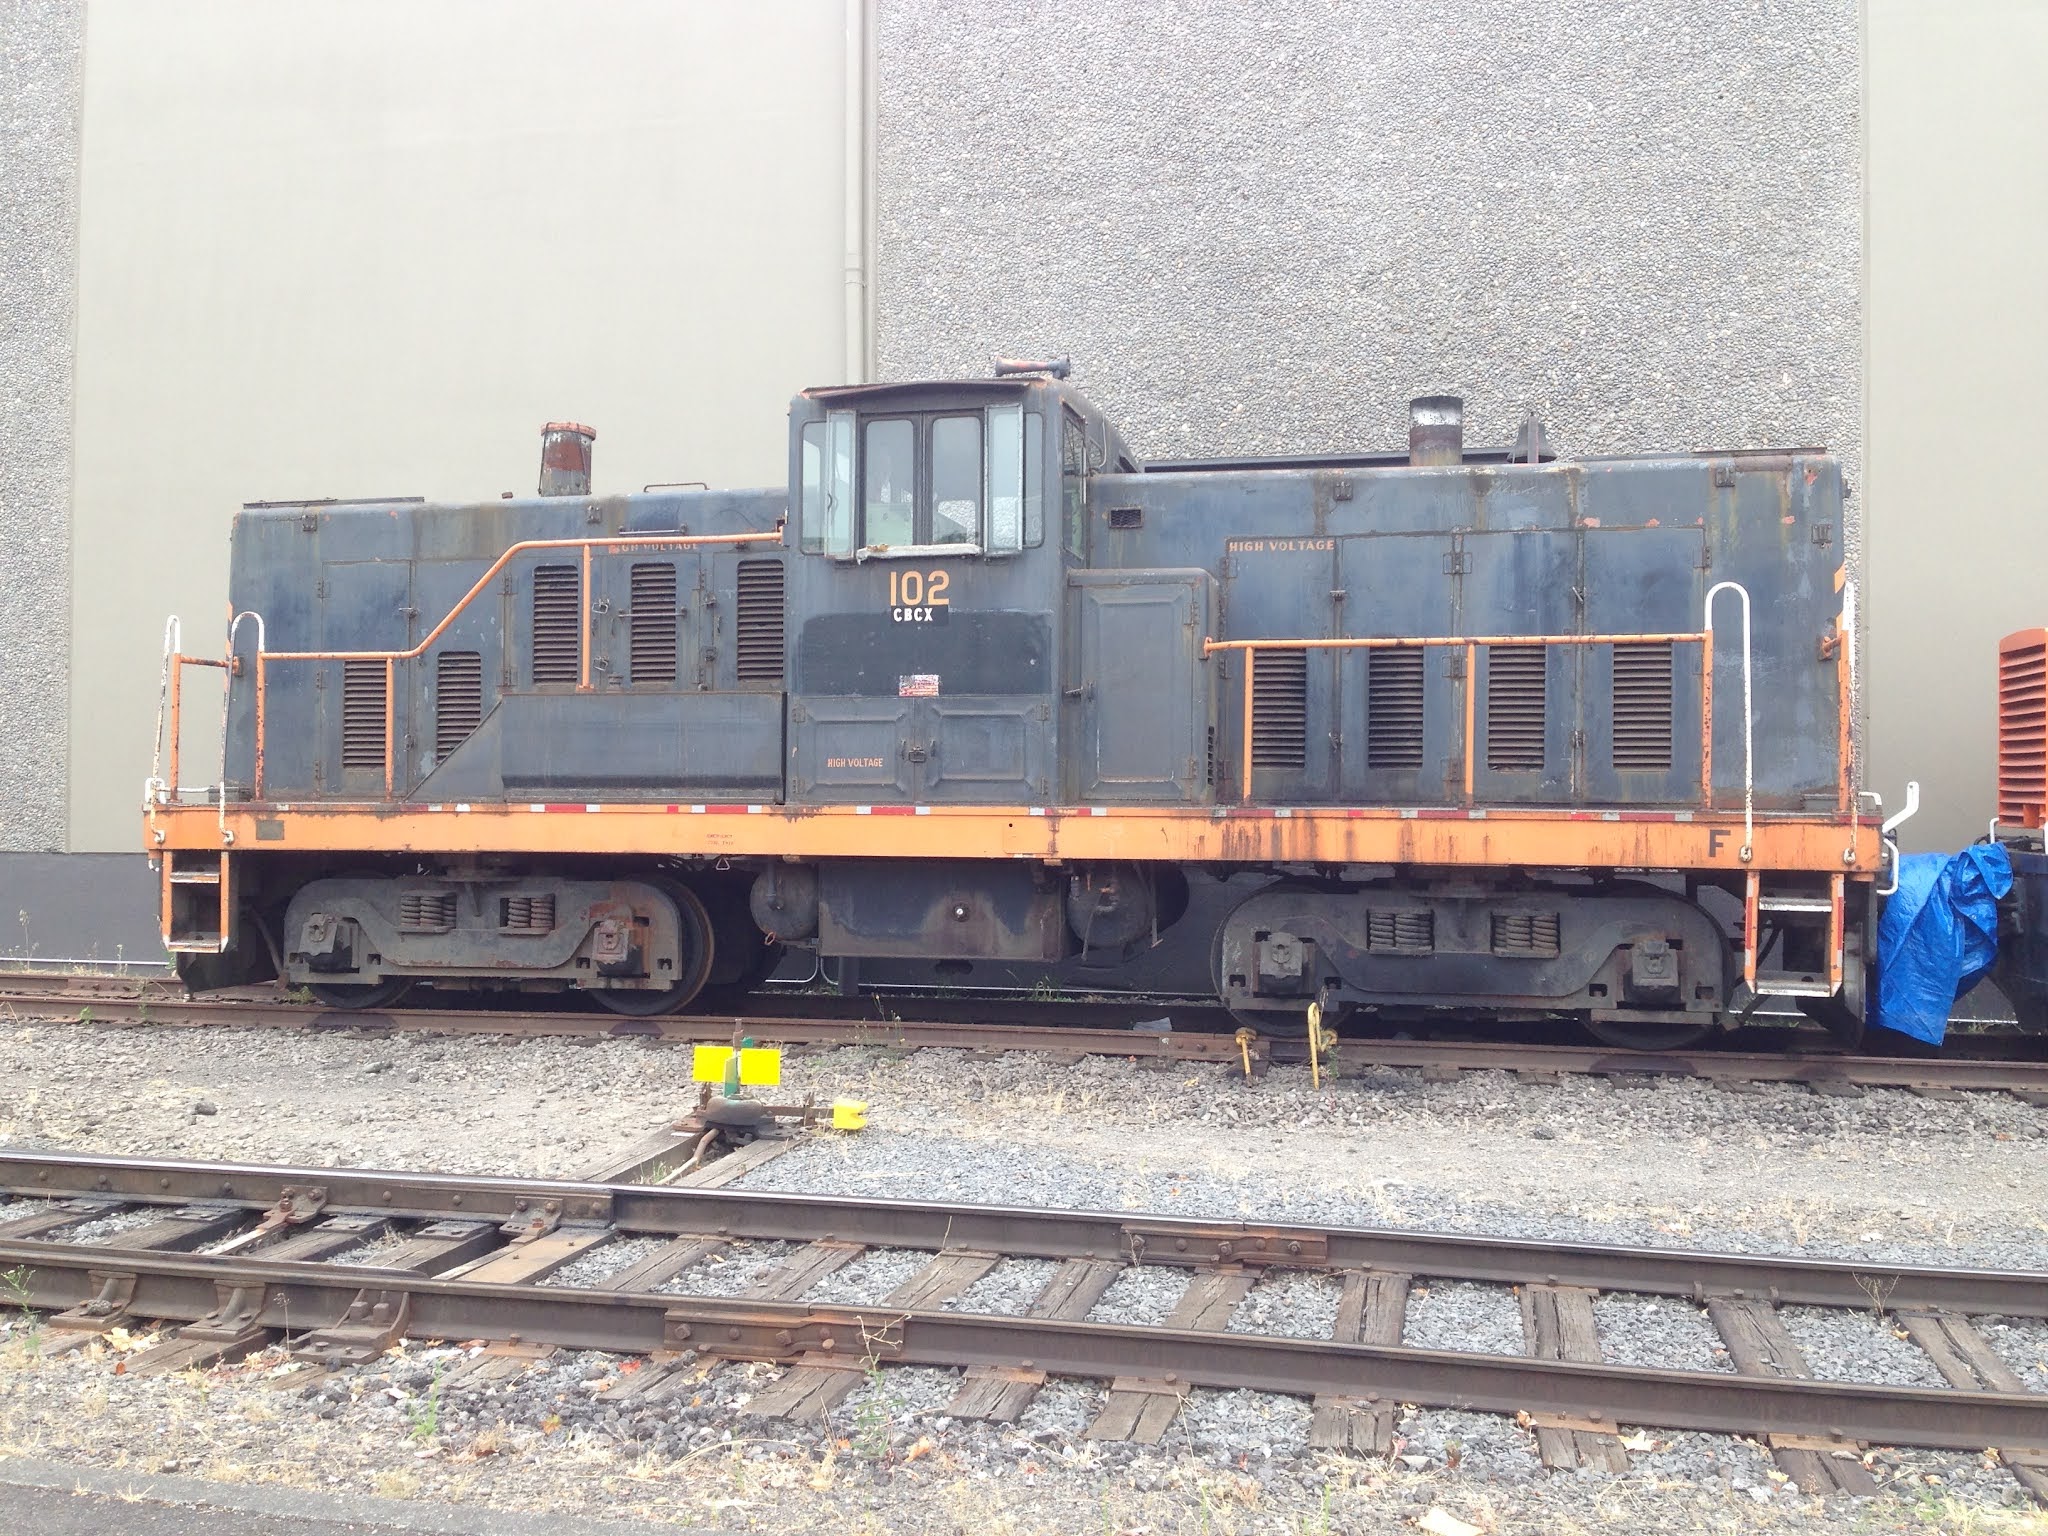
With the little 25 tonner just peeking into the photo on the right, GE 86 ton centercab CBCX-102 looks much more imposing. This loco was originally built for the Pacific Lumber Company in Eureka, California and delivered in 1956. Despite not having the spiffy orange and black paint job and logo of the other two, this is the youngest of the three. The centercab has distinctive rectangular chrome framed headlights, shown below in an oblique view that also highlights the orange safety striping.

It's great to see these workhorses still earning their keep with second, and even third, owners, although clearly not seeing daily use. Finding small railroading scenes like this is a kick and inspiration for my modeling interests as well.
Monday, August 23, 2021
Attitude Adjustment
Life gets busy - between work, family and household responsibilities, it can be a challenge to carve out time to pursue a hobby. Even when opportunity presents itself, the motivation needed to move ahead with planning and designing a layout or focus on a modeling project can seem daunting. My list of projects and accumulation of kits and other materials, at times, seems like another task rather than a relaxing activity.
These feelings around my hobby have an ebb and flow, just as they do in everyday life. When this happens, there are a couple of ways I tend to respond. If I know that the focus or motivation just isn't there, sometimes its best to do something else. Getting outside, whether in the yard, taking a neighborhood walk or out in nature, is a great restorative.

Olympic Mountains from Ocean Shores near Grays Harbor
Being outdoors has always been a part of my life growing up and living in the northwest. I find that I draw energy and inspiration from spending time outside in nature. This picture shows the coastal mountains I have hiked in most of my life as well as the beach area on the Washington coast near Grays Harbor, where my model railroad is set. I am constantly inspired by enjoying this scenery, and often return home with new energy.
On a more day to day level, I've found that there are times where I just need to make a start, focusing on one step in a modeling project or activity. Music can be a great help in getting my creative energies flowing and getting into the immediacy of what is right in front of me, which allows me to relax and become absorbed in the moment, enjoying the craft of modeling.

Bluetooth Stereo System in Layout Room
Last winter I added a small stereo system with bluetooth to my hobby space, allowing me to play favorite tunes from my iPad with decent range and sound. My musicial tastes range from '60s and '70s to contemporary rock and folk music, with a smattering of blues, funk and other genres.
My personal "music therapy" has added to my hobby enjoyment, and eased the transition from everyday cares to being absorbed in the task at hand. Invariably, I find that enjoyable time has passed, progress is made, and my mood is elevated.
Sunday, August 15, 2021
Field Research - PC 9041 GS Gondola
There is an outstanding railroad museum in Snoqualmie, Washington, just East of Seattle toward Snoqualmie Pass off of Interstate 90. In addition to a historic depot downtown and scenic weekend train rides, the museum has both indoor and outdoor exhibits, including a collection of locomotives and rolling stock.
Of great interest to me is a gondola in their collection, one of the only remaining pieces of Pacific Coast Railroad rolling stock. On a visit to the museum, I took a number of photographs of the car to capture the details. Although it sits inside of a fenced siding, I was able to view most of the car from different angles.

PC-9041 GS Drop Bottom Gondola
According to Great Northern Railroad Historical Society (GNRHS) Reference Sheet #364, the Great Northern transferred a number of older GS gondolas from GN series 76000-76249 to the PCRR around 1956 to replace worn out cars for hauling coal. This drop bottom gondola was originally built for the Great Northern in 1918 by Western Steel Car and Foundry in Illinois, as part of the GN's first purchase of General Service (GS) gondolas. After its use by the PCRR, this one went on to serve Rayonier on their logging railroad on the Olympic Peninsula, hauling gravel, and then was donated to the museum in 1986, after 68 years of use, as described on this sign next to the car.

(click to enlarge)
As you can see, the car sits outside and shows the effects of it's long years of service, but amazingly, one can still make out ghostly remnants of the large "PACIFIC COAST" billboard type lettering that the PCRR used on their gondolas.

Faint Lettering on Car Side

Lettering Diagram from Champ Decal Set HG-126
The gondola sits on trucks that have "NP" and "NORPACRY" cast on them, so at some point the original trucks apparently were changed out for these Northern Pacific solid bearing trucks, whether by one of the railroads or the museum, I am not sure. These trucks are similar to the original Bettendorf trucks that were supplied on these gondolas, based on equipment diagrams and photos in the reference sheet.

On the "B" end, it has an Ajax handbrake and you can also see the air retainer valve and the bottom dump door release mechanism. The power handbrakes were added during rebuilding in 1939, when the sides and ends were also replaced.

Brake or "B" End of PC 9041
There is no commercially available model that matches this car, one would need to accept some compromises unless you wanted to completely scratch build it. I plan to kitbash a car or two to represent these signature PCRR gondolas so being able to photograph the car and supplement my other research materials was very welcome.
Sunday, August 8, 2021
The Right Tools
It is sometimes amazing what a difference the right tool can make. While growing up, I learned a lot about hand tools for basic carpentry, plumbing and yard work from my dad and grandfather. Using the "right tool for the job" was a mantra that many of you have likely heard and a lesson I absorbed early.
When I was getting into model aircraft building as a teen, I started out with just a few basic tools, including an Xacto knife, paint brushes, household tweezers and toothpicks. Soon, my developing skills were bumping up against the limits of my tools. My grandmother lifted my modeling to the next level by introducing me to Brookstone, which at that time was a mail order catalog house that offered garden and hobby tools. She would periodically ask me to pick out a tool from their catalog and would order if for me.
The tweezers and clamps from Brookstone in this photo are on my workbench to this day, more than 40 years later, and still help me regularly.

I have continued to add useful tools to my kit, with recent additions of specialized precision pliers and chisel sets. I will cover the pliers in more detail in a later post about bending wire for details. The modelers chisels have made a step change in my modeling, both from a level of detail and confidence perspective. Here's the first modelers chisel that I acquired a number of years ago.

Micro-Mark Modelers Chisel #80893
This chisel, sold by Micro-Mark, has a very sharp hardened blade that is 4mm wide, with rounded edges. I have found this much superior to an Xacto No.17 blade for removing cast on details, or smoothing out ejection marks. The tool has a substantial weight and a ridged gripping surface, both of which provide good control. It works well to remove cast on grab irons and other details from flat surfaces with less tendency to dig in or skip versus the No. 17 blade. In some cases, however, this chisel is too big and it is not ideal on curved surfaces.
A recent post on Ted Culotta's Prototype Railroad Topics blog introduced me to another option for chisel blades. I had been looking for narrower chisels with a shorter handle to use in tight spaces, and had considered a variety of options from several manufacturers that other railroad modelers had recommended. Once I saw Ted's review of the GodHand chiseling tips, I decided that they looked like just what I was searching for, so I ordered the round and flat blade sets shown here (Ted also reviews some other modeling chisels that he uses in the link above) .

GodHand Flat Blade (green) and Round Blade (red) chisel tip sets
GodHand Power Pin Vice below
Both sets include five tips with widths from 1mm to 3mm. The flat blade set is item code GODGH-BBH-1-3, the round blade set is item code GODGH-BBM-1-3. Each set come in a sturdy plastic case that holds the bits firmly. Be aware, these are very sharp! The base of these tips is 3mm in diameter, and is designed to fit into a pin vice or similar holder. Be sure your pin vice collet can accommodate the 3mm diameter.
I also purchased a GodHand power pin vice, item code GODGH-PB-98ST to hold the chisel tips. I was concerned about my other pin vices being large enough for these tips, plus I really wanted a more substantial high quality pin vice, and this one certainly meets those requirements. It has a soft rubber grip, a good weight, and a spinning top. The pin vice is well made, with a very nice blackened knurled steel cap and a precision steel collet. The collet will tightly grip tips or drill bits from 1 to 3.2mm diameter. I like the short length of this tool for precise control and the ability to work in tight places on my models. Other versions are also available.
These are available from HobbyLink Japan as well as other sources, including Amazon. GodHand makes a variety of modeling tools, with many different chisel tip sets. I found the ordering process and service from HobbyLink Japan to be very good, with reasonable and fast shipping as well.
I have been using these chisel tips with great results working on both flat and curved surfaces, such as in between the corrugations on box car ends to remove material with good control. This photo shows use of a rounded tip on the end of a Tyco gondola where I have removed the cast on brake housing.

The rounded tip is ideal for working in this area, following the curves in the plastic. Combined with the sharp working surface, it provides excellent control. In a later post I will describe my kitbash of this "toy train" gondola into an accurate representation of a Texas & Pacific steel gondola, greatly helped by this superb tool.
I'm grateful for the skills my father and grandfather taught me, and for the appreciation of fine tools they, and my grandmother, fostered as I was growing up. Having good tools that are "right for the job" increases my enjoyment of the hobby, and allows me to accomplish a higher level of modeling.
Saturday, August 7, 2021
Underframes (or Dipping Your Toe In)
I don't know about you, but sometimes just contemplating taking that first step is the most difficult, like going to a lake or beach and standing on the shore, working up the nerve to get into the water (up here in the Northwest we know it is going to be cold!).
A few years ago I was at that point when it came to adding underframe details to my models. I had read a lot of information, digested many "how to" articles and educated myself on prototype practices, but I was hesitant to give it a try for fear of "messing it up."
After a little internal pep talk ("you can do this", "how difficult could it be?", "it's just one model, right?"), I decided to dip my toe in, starting with a Red Caboose flat car model decorated for the Great Northern that came with older KC style brakes. I wanted to update the brakes to fit my modeling period of 1965, so I substituted Tichy AB brake components, using a few small pieces of styrene to provide mounting for the brake reservoir and remembering to align the brake cylinder actuator toward the "B" end of the car. I also painted the underframe and weight which forms the "floor" with grimy black from an aerosol spray can, or rattle can.

Red Caboose Flat Car Underframe with AB Brake Components
The results of even this small effort looked better than I had expected. With that first little step behind me I felt ready to jump in, this time adding brake rod detail to an Accurail underframe.

Details Added to Accurail Underframe

Detailed & Painted Underframe
Looking at it today, I know it is not completely accurate. There is no chain between the brake cylinder and the lever. I also could have added the piping between components for more realism, but the level of detail I did add really looked good. One take away after I test fit trucks: the wire brake rods probably need to terminate closer to the centersill as they may interfere with truck swing. But, hey, not bad for a first attempt!
I'm now considering this my typical minimum level of detail for underframes. There are a few other details I will add, like air hoses and coupler cut levers. As a next challenge in building my skills I may try adding brake piping to a few cars. Turns out the water is fine - I know that I can do this and it improves the appearance of my models, plus it is actually fun.
Sunday, August 1, 2021
Where's This Train Headed?
Here is some background and detail on what my modeling and interests in model railroading are about. In my first post, I described my model railroad as a proto-freelanced branch of the Great Northern Railroad, set in the Puget Sound area during 1965, with a forest products emphasis.
Specifically, I'm calling it the Olympic Peninsula Branch of the Pacific Coast Railroad (PCRR), which was actually a small branch of the Great Northern in Western Washington after 1951. The real PCRR was primarily a coal hauling line conceived originally by investors in the Seattle area to carry the coal mined from nearby seams in the foothills of the Cascade Mountains to the port of Seattle for use by steamships.
There is an excellent book, Pacific Coast - Seattle's Own Railroad, authored by Kurt Armbruster, which tells the story of the origins and history of this small railroad. The book focuses primarily on the history from 1874 up to the Great Northern purchase in 1951. Great Northern operated the line until the Burlington Northern merger in 1970.

Book Cover
In my model world, the PCRR operates from Seattle to the Pacific coast on the Olympic Peninsula, and obtains much of its revenue from various forest products industries, including lumber as well as pulp and paper mills. My PCRR pivoted from coal to forest products as the steam era waned and the coal seams were abandoned, expanding it's reach for this rapidly growing revenue source. Using my modeler's license, the line runs mostly on track that actually once belonged to the Northern Pacific Railroad, extending west from Centralia to Grays Harbor on the coast, as well as north to the naval shipyard at Bremerton, a significant customer. The Olympic Peninsula is the land mass west of Puget Sound, between Seattle and the Pacific coast, where these locales are found (see map below).
It's important to distinguish between the Pacific Coast Railroad and the Pacific Coast Railway, a completely different and unrelated railroad that operated in California.
When the Great Northern purchased the Pacific Coast Railroad, they soon replaced steam engines with diesels, using primarily GN owned motive power, and also "upgraded" some of the well used PCRR rolling stock, especially the aged gondolas used for hauling coal, with surplus GN cars.
In my world, the PCRR has more and a wider variety of rolling stock as well as some of their own diesel engines, but GN or other Hill Line motive power and rolling stock are common. This allows me to plausibly operate Northern Pacific or Spokane, Portland and Seattle Railway (SP&S) equipment alongside PCRR. As the Milwaukee Railroad also operated in this area, there is significant interchange with them as well.
This map shows the trackage, which was originally Northern Pacific, then BNSF, and is currently owned and operated by The Puget Sound & Pacific Railroad Co., part of Genesee and Wyoming Inc. a short line railroad holding company.

credit - By Aaron Schwarz - http://psp.ghrr.org/, CC BY-SA 3.0, https://commons.wikimedia.org/w/index.php?curid=24317853
My layout will focus on a major pulp and paper mill complex in Grays Harbor with local switching and a small yard and team track. It will be a shelf layout primarily, although I hope to be able to accommodate a loop of track for a bit of continuous running as well. This is both for my own enjoyment as well as my grandkids, in case we just want to "run trains". Offline industries will include a plywood mill, lumber mills, creosoting plant, as well as a fish processor and cranberry packing plant. I mentioned the Puget Sound Naval Shipyard in Bremerton, and PSNS will be an important, if more occasional customer providing interesting loads.
This scenario allows me to model and operate a range of rolling stock, from standard 40 foot single or double door boxcars, to flat cars, gondolas and chemical tank cars. Motive power is primarily switchers and four axle locomotives for short local trains setting out and picking up cars at the mill and other industries. I plan to model the pulp and paper complex extensively and will discuss this in more depth soon.
Another attraction of my chosen railroads and setting is the opportunity to explore the history of these railroads in the Northwest and to model them accurately as I learn and build my skills. Future posts will expand on these themes.

Photo by author
Friday, July 16, 2021
Successive Approximation
We are fortunate to live in a time where very accurate railroad models are broadly available, whether in kit form or ready-to-run, in many scales and for many eras and railroads. This may be most true for HO scale, where some amazing models are being produced for us to enjoy.
While I enjoy building models and am working to further develop my modeling skills for adding accurate details, there are times where models that are fully assembled and ready-to-run, or nearly so, catch my eye and my wallet. An advantage of this is that my fleet of rolling stock has grown with some beautifully produced cars that can immediately be admired and eventually run on the layout.
These three Great Northern caboose models are meant to represent steel wide vision caboose designs from the 1960's and are an interesting example of the evolution of ready-to-run plastic models.

Athearn & Atlas Models
(click to enlarge)
The model on the left above is a custom printed Athearn model that was once produced by Track One from the Athearn wide vision caboose. Track One has a Facebook page and may still be doing business, although the last post is from 2019. While the model itself is not highly accurate for GN (the model is closest to a Rock Island prototype), the printing is well done, including the signature GN safety slogan, but without the "radio equipped" lettering. The X-101 was a wide vision caboose built by International Car for the GN, so the general appearance is similar., although a third side window is lacking.
This model is what many would call a "stand in" due to some non-prototypical design features. I have added more appropriate trucks with metal wheelsets and Kadee 58 knuckle couplers. It really isn't bad for an Athearn blue box model with molded on details like the curved grab irons, but does lack GN specific details.
On the right is the Atlas version of a GN standard vision steel caboose. Note the difference in the width of the cupola. This model is closer to the actual cars that the GN ordered from Morrison International in 1963 and 1964, but still not exactly prototypically accurate. Unfortunately the silver roof color is incorrect. This car came with steel wheelsets and knuckle couplers. It is lacking the GN tool and battery boxes on the side, and the unique GN end gates, with minor differences in the side window arrangement, among a few other details. Again, beautifully painted and printed with crisp lettering and it has separately applied wire grab irons.

Walthers Mainline Model
The recently released Walthers version of the Morrison International caboose is very nearly accurate for the GN right out of the box, with just a few specific details that could be added. The window arrangement is correct for the GN. Interestingly, as this is a Walthers Mainline model, it does not include any grab irons. They are available as an add on detailing kit, however, and there are molded drilling dimples on the car to help in placing them. I have not yet installed these as I just recently got this car. It does include the distinctive GN tool boxes and end gates. Unfortunately, Walthers quickly sold out of this car decorated for GN. I was able to find one available from a dealer online after finding that my pre-order through another dealer was not fulfilled by Walthers.

Atlas, Athearn and Walthers Ends
(click to enlarge)
It isn't a major challenge to add to or modify these to better represent the actual GN caboose they each represent. For example, adding the tool boxes and end gates, a firecracker radio antenna to the cupola, perhaps decal additions where appropriate, preferred couplers (Kadee scale head are my standard), are all relatively simple changes to improve on the existing level of detail.
I like each of these models and they graphically illustrate the progression of ever more accurate mass production models that are being produced. There may never be a "perfect" exactly prototypical model with every detail and feature replicated but the standards seem to continually improve.
Sunday, July 11, 2021
The Current State
A popular phrase used in business these days is "current state," which refers to where the organization, or a particular process or practice in that organization, is now: the situation as it currently stands. Defining the current state is usually step one in considering where the organization wants to get to.
In the case of my modeling and my model railroad, this is my current state:

Workbench (click image to enlarge)
My work area is well set up for my purposes, consisting of an old stamped steel topped wooden table with self-healing cutting mat and cardboard on top, a swivel arm lamp, soft jaw swivel vice, foam cradle and sheets for model work without damaging paint or details, and flat tile pieces for cutting and glue puddling surfaces.
The small drawers hold small detail parts like grab irons, ladders, rivets/nbw, brake wheels, couplers and screws, while the larger plastic drawers primarily hold tools, small clamps and jigs. The ceramic mugs are convenient holders for frequently used tools. Adhesives and the like are readily at hand.
Yes, I am a tool guy. Jack Burgess has written extensively in Model Railroad Hobbyist and elsewhere of his appreciation for good tools and a plentiful variety of them, and I am an eager disciple of that philosophy. The two blue handled Xuron specialty pliers sitting on the bench are recent purchases. Future posts will indulge my interest in useful specialty tools of high quality, while rationalizing that tendency by demonstrating how it has improved my modeling.
Two in-progress models are on the bench; a Proto 2000 tank car nearing completion in a foam cradle, and an Intermountain Milwaukee (MILW) 40 foot box car. I tend to work in bursts, completing a step or two on a model, then working on another while glue dries or creative energies are replenished.
Not shown are additional detail parts stored in small plastic totes under the workbench, and a variety of styrene and wire in the desk drawer, along with measuring and drafting tools that come in handy.

Current Layout "Status"
The layout, on the other hand, is not as "developed" as the modeling workbench, as shown above. The sheet of 2" blue foam was purchased some time ago, but has languished on the opposite side of the room from my workbench with no progress to speak of. This will be the surface of the shelf layout, to be supported by future benchwork, possibly Ikea shelving. Various other "supplies" and rolling stock (kits and RTR) are stored in boxes. The plastic wrapped dark green material is fibrous furnace filter mats for evergreen trees, while another box holds scenic materials such as ground foam and some readymade trees and brush.
The goal is to work on the first shelf module during the rest of this year, even if it becomes a "practice" layout that gets reworked later. I've procrastinated this step long enough.
I'm itching to put those completed models and sound equipped DCC locomotives on a track so I can advance the throttle and move a train, even if just a few feet.
Beginnings
The beginning of a story (or a blog about railroad modeling) sets the scene and points in a direction of travel or narrative. The main characters are also revealed, although not always right away.
My scene is a proto-freelanced subsidiary of the Great Northern Railroad in the Puget Sound region of Western Washington in 1965, with an emphasis on forest products, particularly paper mills. I model in HO scale and enjoy building models that are reasonably accurate and detailed. Currently, my layout is only a concept although my intention is to begin construction of a shelf layout module this year. My workbench is active with model building projects ranging from straightforward plastic kit builds to resin or mixed media kits, along with some superdetailing and kitbash projects. Scale vehicles are an aspect of my interests and will feature here from time to time as well.
In this case, the direction is topics around my interests in the hobby of model railroading, as well as the history of my chosen railroads, and related subjects that capture my interest or may be of interest to others.
I'm no modeling or historical guru. My blog is intended as a creative outlet and a way for me to share my efforts as I continue to build skills and knowledge. It's also a means to give myself some encouragement as well as accountability to work toward my hobby goals.


The model railroading bug started for me when I was about eight or nine and my dad brought home an Athearn starter set. This is the box that set came in, which currently is in use as an open topped tray to hold a few structure models. Although the picture is a steam engine with passenger cars, the set was a diesel engine with freight cars.
The photo below shows those set cars as well as a few items from those that my dad purchased to expand our small Plywood Pacific over the next few years. There were others as well, many still stored in my boxes of rolling stock, some kitbash or upgrade fodder.

The boxes in the set are distinctively different than artwork for Athearn blue box cars sold separately, with the rolling stock boxes being nearly all light blue, no image on top. Even the locomotive box is different in that it has the blue band on each end of the box top.
You will note a few things here. First, the locomotive and caboose are Southern Pacific, not Great Northern. At least there are two Hill Lines box cars in the set, the Northern Pacific mechanical refrigerator and the Great Northern plug door box. Later purchases trended more closely toward my growing fascination with the GN and other Hill Lines (NP, CB&Q, SP&S and Pacific Coast RR).
The Tyco C420 locomotives are both fantasy schemes, although to my eyes they were very attractive at the time! Many hours of fun model railroading were provided by these locos, which featured working headlights and had a massive look. My deep appreciation for Alco diesels may have just started with these two models.
The Roundhouse covered hopper kit is one of those early cars that I have started to kitbash and upgrade. It is getting square hatch covers from Details West, along with wire grabs and ladder rungs, more detailed brake gear, new trucks, paint and decals. This is one of those on again, off again projects that sits and waits patiently for inspiration.
From this start, my interests in building models developed, as did my focus on the Great Northern. Much later I settled on 1965 as my modeling year. This was due to a number of reasons, including the type of equipment operated, roof-walks and a somewhat contrary attraction to the struggles of railroads at the time from the competitive pressures of trucking, consolidations and fading passenger traffic. Last but probably not least, I found Glacier Green to be a favorite rolling stock color scheme, while not sharing an appreciation for Big Sky Blue with the simplified Rocky logo, which was introduced by the GN in the next year.
Later posts will expand on these themes but for now this gives you some idea of what I am about. I hope that you find something that is of interest and I welcome the opportunity to hear from you as the journey progresses.
Subscribe to:
Posts (Atom)

-
 Here is some background and detail on what my modeling and interests in model railroading are about. In my first post, I described my model...
 -
 The Northwest has a long history of forest products production, from timber and plywood to paper, providing many carloads of revenue for th...
 -
 I am always curious about the tools people have on their modeling workbenches, looking for ways of doing things better or with more precisi...