Monday, August 23, 2021

Attitude Adjustment

 Life gets busy - between work, family and household responsibilities,  it can be a challenge to carve out time to pursue a hobby.  Even when opportunity presents itself, the motivation needed to move ahead with planning and designing a layout or focus on a modeling project can seem daunting.  My list of projects and accumulation of kits and other materials, at times, seems like another task rather than a relaxing activity.

These feelings around my hobby have an ebb and flow, just as they do in everyday life. When this happens, there are a couple of ways I  tend to respond.  If I know that the focus or motivation just isn't there, sometimes its best to do something else.  Getting outside, whether in the yard, taking a neighborhood walk or out in nature, is a great restorative.


Olympic Mountains from Ocean Shores near Grays Harbor

Being outdoors has always been a part of my life growing up and living in the northwest.  I find that I draw energy and inspiration from spending time outside in nature.  This picture shows the coastal mountains I have hiked in most of my life as well as the beach area on the Washington coast near Grays Harbor, where my model railroad is set.  I am constantly inspired by enjoying this scenery, and often return home with new energy.

On a more day to day level, I've found that there are times where I just need to make a start, focusing on one step in a modeling project or activity.  Music can be a great help in getting my creative energies flowing and getting into the immediacy of what is right in front of me, which allows me to relax and become absorbed in the moment, enjoying the craft of modeling.


Bluetooth Stereo System in Layout Room

Last winter I added a small stereo system with bluetooth to my hobby space, allowing me to play favorite tunes from my iPad with decent range and sound.  My musicial tastes range from '60s and '70s to contemporary rock and folk music, with a smattering of blues, funk and other genres.

My personal "music therapy" has added to my hobby enjoyment, and eased the transition from everyday cares to being absorbed in the task at hand.  Invariably, I find that enjoyable time has passed, progress is made, and my mood is elevated.

Sunday, August 15, 2021

Field Research - PC 9041 GS Gondola

 There is an outstanding railroad museum in Snoqualmie, Washington, just East of Seattle toward Snoqualmie Pass off of Interstate 90.  In addition to a historic depot downtown and scenic weekend train rides, the museum has both indoor and outdoor exhibits, including a collection of locomotives and rolling stock.

Of great interest to me is a gondola in their collection, one of the only remaining pieces of Pacific Coast Railroad rolling stock.  On a visit to the museum, I took a number of photographs of the car to capture the details.  Although it sits inside of a fenced siding, I was able to view most of the car from different angles.


PC-9041 GS Drop Bottom Gondola

According to Great Northern Railroad Historical Society (GNRHS) Reference Sheet #364, the Great Northern transferred a number of older GS gondolas from GN series 76000-76249 to the PCRR around 1956 to replace worn out cars for hauling coal.  This drop bottom gondola was originally built for the Great Northern in 1918 by Western Steel Car and Foundry in Illinois, as part of the GN's first purchase of General Service (GS) gondolas.  After its use by the PCRR, this one went on to serve Rayonier on their logging railroad on the Olympic Peninsula, hauling gravel, and then was donated to the museum in 1986, after 68 years of use, as described on this sign next to the car.


(click to enlarge)

As you can see, the car sits outside and shows the effects of it's long years of service, but amazingly, one can still make out ghostly remnants of the large "PACIFIC COAST" billboard type lettering that the PCRR used on their gondolas.


Faint Lettering on Car Side

Lettering Diagram from Champ Decal Set HG-126

The gondola sits on trucks that have "NP" and "NORPACRY" cast on them, so at some point the original trucks apparently were changed out for these Northern Pacific solid bearing trucks, whether by one of the railroads or the museum, I am not sure. These trucks are similar to the original Bettendorf trucks that were supplied on these gondolas, based on equipment diagrams and photos in the reference sheet.


On the "B" end, it has an Ajax handbrake and you can also see the air retainer valve and the bottom dump door release mechanism.  The power handbrakes were added during rebuilding in 1939, when the sides and ends were also replaced.


Brake or "B" End of PC 9041

There is no commercially available model that matches this car, one would need to accept some compromises unless you wanted to completely scratch build it.  I plan to kitbash a car or two to represent these signature PCRR gondolas so being able to photograph the car and supplement my other research materials was very welcome.


Sunday, August 8, 2021

The Right Tools

 It is sometimes amazing what a difference the right tool can make.  While growing up, I learned a lot about hand tools for basic carpentry, plumbing and yard work from my dad and grandfather.  Using the "right tool for the job" was a mantra that many of you have likely heard and a lesson I absorbed early.  

When I was getting into model aircraft building as a teen, I started out with just a few basic tools, including an Xacto knife, paint brushes, household tweezers and toothpicks.  Soon, my developing skills were bumping up against the limits of my tools.  My grandmother lifted my modeling to the next level by introducing me to Brookstone, which at that time was a mail order catalog house that offered garden and hobby tools.  She would periodically ask me to pick out a tool from their catalog and would order if for me.

The tweezers and clamps from Brookstone in this photo are on my workbench to this day, more than 40 years later, and still help me regularly.


I have continued to add useful tools to my kit, with recent additions of specialized precision pliers and chisel sets.  I will cover the pliers in more detail in a later post about bending wire for details.  The modelers chisels have made a step change in my modeling, both from a level of detail and confidence perspective.  Here's the first modelers chisel that I acquired a number of years ago.


Micro-Mark Modelers Chisel #80893

This chisel, sold by Micro-Mark, has a very sharp hardened blade that is 4mm wide, with rounded edges.  I have found this much superior to an Xacto No.17 blade for removing cast on details, or smoothing out ejection marks.  The tool has a substantial weight and a ridged gripping surface, both of which provide good control.  It works well to remove cast on grab irons and other details from flat surfaces with less tendency to dig in or skip versus the No. 17 blade.  In some cases, however, this chisel is too big and it is not ideal on curved surfaces.

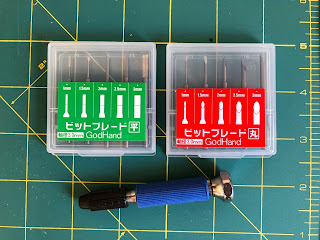
A recent post on Ted Culotta's Prototype Railroad Topics blog introduced me to another option for chisel blades.  I had been looking for narrower chisels with a shorter handle to use in tight spaces, and had considered a variety of options from several manufacturers that other railroad modelers had recommended.  Once I saw Ted's review of the GodHand chiseling tips, I decided that they looked like just what I was searching for, so I ordered the round and flat blade sets shown here (Ted also reviews some other modeling chisels that he uses in the link above) .


GodHand Flat Blade (green) and Round Blade (red) chisel tip sets
GodHand Power Pin Vice below

Both sets include five tips with widths from 1mm to 3mm.  The flat blade set is item code GODGH-BBH-1-3, the round blade set is item code GODGH-BBM-1-3.  Each set come in a sturdy plastic case that holds the bits firmly.  Be aware, these are very sharp!  The base of these tips is 3mm in diameter, and is designed to fit into a pin vice or similar holder.  Be sure your pin vice collet can accommodate the 3mm diameter.

I also purchased a GodHand power pin vice, item code GODGH-PB-98ST to hold the chisel tips.  I was concerned about my other pin vices being large enough for these tips, plus I really wanted a more substantial high quality  pin vice, and this one certainly meets those requirements.  It has a soft rubber grip, a good weight, and a spinning top.  The pin vice is well made, with a very nice blackened knurled steel cap and a precision steel collet.  The collet will tightly grip tips or drill bits from 1 to 3.2mm diameter. I like the short length of this tool for precise control and the ability to work in tight places on my models.  Other versions are also available.

These are available from HobbyLink Japan as well as other sources, including Amazon.  GodHand makes a variety of modeling tools, with many different chisel tip sets.  I found the ordering process and service from HobbyLink Japan to be very good, with reasonable and fast shipping as well.

I have been using these chisel tips with great results working on both flat and curved surfaces, such as in between the corrugations on box car ends to remove material with good control.  This photo shows use of a rounded tip on the end of a Tyco gondola where I have removed the cast on brake housing.


The rounded tip is ideal for working in this area, following the curves in the plastic.  Combined with the sharp working surface, it provides excellent control.  In a later post I will describe my kitbash of this "toy train" gondola into an accurate representation of a Texas & Pacific steel gondola, greatly helped by this superb tool.

I'm grateful for the skills my father and grandfather taught me, and for the appreciation of fine tools they, and my grandmother, fostered as I was growing up.  Having good tools that are "right for the job" increases my enjoyment of the hobby, and allows me to accomplish a higher level of modeling.

Saturday, August 7, 2021

Underframes (or Dipping Your Toe In)

 I don't know about you, but sometimes just contemplating taking that first step is the most difficult, like going to a lake or beach and standing on the shore, working up the nerve to get into the water (up here in the Northwest we know it is going to be cold!).

A few years ago I was at that point when it came to adding underframe details to my models.  I had read a lot of information, digested many "how to" articles and educated myself on prototype practices, but I was hesitant to give it a try for fear of "messing it up."

After a little internal pep talk ("you can do this", "how difficult could it be?", "it's just one model, right?"), I decided to dip my toe in, starting with a Red Caboose flat car model decorated for the Great Northern that came with older KC style brakes.  I wanted to update the brakes to fit my modeling period of 1965, so I substituted Tichy AB brake components, using a few small pieces of styrene to provide mounting for the brake reservoir and remembering to align the brake cylinder actuator toward the "B" end of the car.  I also painted the underframe and weight which forms the "floor" with grimy black from an aerosol spray can, or rattle can.


Red Caboose Flat Car Underframe with AB Brake Components


The results of even this small effort looked better than I had expected. With that first little step behind me I felt ready to jump in, this time adding brake rod detail to an Accurail underframe.  


Details Added to Accurail Underframe


Once again I used Tichy AB brake components, fabricating brake levers from styrene strip, and using wire grab irons as the hangers.  Dimensions were based on reference information and hand trimmed to shape with an Exacto blade.  I also added a train line (you can see it crossing through the centersill), along with brake rods from bronze wire.  The layout is generic and not necessarily 100% prototypical for a particular car, but a reasonable appearance.  Here is the result after painting with flat grimy black.


Detailed & Painted Underframe


Looking at it today, I know it is not completely accurate.  There is no chain between the brake cylinder and the lever.  I also could have added the piping between components for more realism, but the level of detail I did add really looked good.  One take away after I test fit trucks:  the wire brake rods probably need to terminate closer to the centersill as they may interfere with truck swing.  But, hey, not bad for a first attempt!

I'm now considering this my typical minimum level of detail for underframes.  There are a few other details I will add, like air hoses and coupler cut levers.  As a next challenge in building my skills I may try adding brake piping to a few cars.  Turns out the water is fine - I know that I can do this and it improves the appearance of my models, plus it is actually fun.

Sunday, August 1, 2021

Where's This Train Headed?

Here is some background and detail on what my modeling and interests in model railroading are about.  In my first post, I described my model railroad as a proto-freelanced branch of the Great Northern Railroad, set in the Puget Sound area during 1965, with a forest products emphasis.

Specifically, I'm calling it the Olympic Peninsula Branch of the Pacific Coast Railroad (PCRR), which was actually a small branch of the Great Northern in Western Washington after 1951.  The real PCRR was primarily a coal hauling line conceived originally by investors in the Seattle area to carry the coal mined from nearby seams in the foothills of the Cascade Mountains to the port of Seattle for use by steamships.  

There is an excellent book, Pacific Coast - Seattle's Own Railroad, authored by Kurt Armbruster, which tells the story of the origins and history of this small railroad.  The book focuses primarily on the history from 1874 up to the Great Northern purchase in 1951.  Great Northern operated the line until the Burlington Northern merger in 1970.


Book Cover


The book is available for purchase through the Great Northern Railroad Historical Society (GNRHS).  You can follow a link to the GNRHS store page for the book here.  

In my model world, the PCRR operates from Seattle to the Pacific coast on the Olympic Peninsula, and obtains much of its revenue from various forest products industries, including lumber as well as pulp and paper mills. My PCRR pivoted from coal to forest products as the steam era waned and the coal seams were abandoned, expanding it's reach for this rapidly growing revenue source.  Using my modeler's license, the line runs mostly on track that actually once belonged to the Northern Pacific Railroad, extending west from Centralia to Grays Harbor on the coast, as well as north to the naval shipyard at Bremerton, a significant customer.  The Olympic Peninsula is the land mass west of Puget Sound, between Seattle and the Pacific coast, where these locales are found (see map below).

It's important to distinguish between the Pacific Coast Railroad and the Pacific Coast Railway, a completely different and unrelated railroad that operated in California.

When the Great Northern purchased the Pacific Coast Railroad, they soon replaced steam engines with diesels, using primarily GN owned motive power, and also "upgraded" some of the well used PCRR rolling stock, especially the aged gondolas used for hauling coal, with surplus GN cars.  

In my world, the PCRR has more and a wider variety of rolling stock as well as some of their own diesel engines, but GN or other Hill Line motive power and rolling stock are common.  This allows me to plausibly operate Northern Pacific or Spokane, Portland and Seattle Railway (SP&S) equipment alongside PCRR.  As the Milwaukee Railroad also operated in this area, there is significant interchange with them as well.

This map shows the trackage, which was originally Northern Pacific, then BNSF, and is currently owned and operated by The Puget Sound & Pacific Railroad Co., part of Genesee and Wyoming Inc. a short line railroad holding company.


My layout will focus on a major pulp and paper mill complex in Grays Harbor with local switching and a small yard and team track.  It will be a shelf layout primarily, although I hope to be able to accommodate a loop of track for a bit of continuous running as well.  This is both for my own enjoyment as well as my grandkids, in case we just want to "run trains".  Offline industries will include a plywood mill, lumber mills, creosoting plant, as well as a fish processor and cranberry packing plant.  I mentioned the Puget Sound Naval Shipyard in Bremerton, and PSNS will be an important, if more occasional customer providing interesting loads.

This scenario allows me to model and operate a range of rolling stock, from standard 40 foot single or double door boxcars, to flat cars, gondolas and chemical tank cars.  Motive power is primarily switchers and four axle locomotives for short local trains setting out and picking up cars at the mill and other industries.  I plan to model the pulp and paper complex extensively and will discuss this in more depth soon.

Another attraction of my chosen railroads and setting is the opportunity to explore the history of these railroads in the Northwest and to model them accurately as I learn and build my skills.  Future posts will expand on these themes.


Photo by author

This photo is a present day view of the Navy owned track near Bremerton, my local railroad only a mile or so from where I live. I think it captures the spirit of branch line railroading for me, with the tracks leading to adventure and discovery around the bend ahead.

Happy Holidays!

 Wishing everyone a peaceful Holiday Season with family and friends.