Friday, November 29, 2024

On Building A Freight Car Fleet

A Portion of The Kit Stash

 Like many model railroaders, I have accumulated a large number of freight cars and locomotives over the years.  My early Athearn train set cars and additions from Model Die Casting (Roundhouse), Tyco and Con-Cor were later joined by more detailed models from Intermountain, Red Caboose and others.

My early purchases as I got more serious about the hobby were from hobby shops, and occasionally mail order, as this was before the Internet.  Most were kits, because I had enjoyed building aircraft models and this carried over into my model railroad hobby.  There were a few "ready to run" model purchases, joined by some gifts from family.

When I got even more serious about the hobby, I found other kit manufacturers such as CB&T, Branchline and LifeLike Proto 2000 (now Walthers Proto).  There were even a few exotic (to me) resin kits from Sunshine as well as swap meet finds of other craftsman type kits.

Some of these purchases were spurred by my interest in the Great Northern and other Hill Lines, some by what I had seen on the tracks in real life as a kid, and some by whim.  I did tend to stick with the 1960's, despite temptation in the form of gorgeous looking modern era cars.

For a long time, however, my purchases were only loosely guided by a vague concept of how I might eventually incorporate them into a large model railroad scheme.  Some of this was understandably the result of lack of time to embark on planning and building a layout, or defining what it would even look like.  Some due to the shiny allure of a new model that I happened on and convinced myself I really wanted, without much thought of how it "fit" into any bigger plan.  Some just looked fun to build.

When I began to narrow my focus, and develop an interest in building more detailed models, it was actually helpful in limiting impulse buying.  It has not slowed me down but it has  guided me toward models that I know I really want.  Some earlier buys have been sold to make way for things that better fit where I see myself going.

Recent purchases have tended toward craftsman kits or kitbash opportunities that will challenge and develop my skills.  There are some incredible small makers of resin car and mini kit offerings along with masters of kitbashing who share their talents for me to learn from.

As I am not building a large layout with a big “fleet”, I’m not as much driven to balance my models with car distributions or relative numbers of a particular car as I am  to explore modeling challenges.  I am adding some particular car types in line with my forest products interest.  This includes tank cars, double door boxcars and flat cars.  The Great Northern is my home road, along with subsidiary Pacific Coast, and sister roads Northern Pacific, SP&S and CB&Q so these roads feature prominently.

Wednesday, November 27, 2024

A Return and Resinating

 I am somewhat embarrassed at my lack of progress as I re-read my last post (from January!). Of course there are reasons, none of which are of much import other than life’s adventures. Everyone is healthy with no significant challenges or issues. No sense dwelling on where the time has gone as we can only go forward.

My workspace, while compact, is all set up and is proving functional.  The picture below shows the arrangement, with most of my commonly used tools at hand.

As usual, all pictures can be enlarged by clicking on them

The space is well lit and the compactness actually helps minimize my tendency toward clutter. The open shelves house more tools, projects, reference books, styrene, wire and small commonly used detail parts such as grab irons, ladders, uncoupling levers, screws and the like.  More details such as doors, roofs, roofwalks, underframe and brake components, scenery and vehicle details are on the shelving with doors just visible at extreme left.

While I have not been building much, accumulating more freight car kits has continued.  There are two cabinets above on the wall filled with my kit stash, which now has some 240 styrene, resin and hybrid kits in total (yikes, this is the first time I have put that total down in one place!). I have been disciplined about sticking with my 1965 modeling period with a focus on the West and my interest in forest products industries.  Opportunities to pick up a few out of production kits from Sunshine, Speedwitch and other small resin kit makers have allowed me to stash some signature cars that I am very excited to have.

Given my current interests, as well the limited space for a small six foot switching layout, I am honing my focus on the cars that I want to build for both my historical interest as well as growing my modeling skills. As a result, I have been judiciously selling a few kits that no longer fit and am also selling some ready-to-run (RTR) cars, particularly when there is a kit I can build to replace them.  My space will only allow use of a handful of cars at a time, so enjoyable kits to build are a priority now.  Model building is the part of this hobby that I enjoy the most, and I am finding that historical research to construct accurate models with high fidelity is very satisfying.


Resinating

On that note, I have finally started on my first resin boxcar kit after an epic length of time procrastinating.  The kit, Funaro & Camerlengo (F&C) number 8400, of a Pennsylvania Railroad (PRR) X37 single door boxcar, is sitting on the workbench in the photo above.  The prototype is similar to a 1937 design boxcar, with some characteristic Pennsy design features.  These were 40’ length cars with a 10’ 4” inside height. The roof has distinctive depressed panels at each end for car clearance, with a wooden roofwalk.  The sides have a unique alternating rivet pattern and most of the X37’s rode on PRR coil elliptic 2D-F19 trucks with both leaf and coil springs. Here is a prototype builders photograph.


You will also note the interesting two rung steps on each corner.  It is a very appealing car with its slightly out of the ordinary look versus other cars of the time.  The PRR built 1000 of theses single door cars starting in December 1939 and a large number were still on the roster in my modeling year of 1965.

Here is the kit on my workbench after removing it from the box.


In deciding on which resin car kit to start with, I considered a few factors, including having a one piece body with a fairly standard underframe, standard ladders versus grab irons, readily available decals and good prototype data to work from.  I do realize that there are certain challenges that come with most F&C kits, but so far it has been within my capabilities and I expect it will look decent when finished. Honestly, I also purchased this kit at a discount and would not be overly distraught if I messed up.  The kit is readily available and could be replaced if the worst happened, unlike many of my others.

I’m making progress this week on flash clean up and have ordered trucks and decals.  I will post in progress photos and commentary, including some enhancements, over the coming weekend.  For now, I wish all of you in the US a Happy Thanksgiving.

Monday, January 1, 2024

Happy Holidays & A New Years Resolution or Two

 So much for plans and intentions!  This past year has been full of  life's curveballs and my batting average has taken a big hit.  Work and family have taken precedence while I have little to show for progress on modeling projects, although some key kits and detail parts have been acquired for existing projects and several (many) new ones have been added to the stash. My wife has accused me of being a collector and the current view would lead one to agree with her.  Time to change that and build something.

 On the plus side, we finally have our occupancy permit for the new house that I mentioned in June (!).  Moving has commenced and space is cleared for my modeling workbench.  Over the next couple of weeks I should be able to move the stored kits, supplies and such while setting up the space for active modeling, so my first resolution for 2024 is to build at least three resin kits before the end of June.  A Westerfield Canadian National long gondola (kit 7111) purchased in June of 2022 will be my first.  After that, there are a few one piece box car kits to choose from (RCW or Yarmouth first probably) as good next steps in building my resin "muscles."

The layout configuration is becoming clear, likely an L-shape shelf by the workbench with a pulp & paper mill complex.  This will be the Puget Sound Pulp & Timber plant, loosely based on the actual mill (later Georgia Pacific, now a park) on the waterfront in Everett Washington.  My space will only allow a compressed portion of the mill, but it will include switching for a nice variety of my cars.  I will cover much more about this plan in future posts.  

The potential for another layout that will be more operational and grandchild friendly has opened up in our loft space.  The intention is to have them build some nice basic cars (Accurail, etc.) so that they can see their handiwork as we play with trains together.  This is a great use for many cars that I purchased before getting the rivet-counting, super-detailing, prototypical modeling bug.  It also should satisfy my desire for watching some trains go around the loop.  I have a track plan from many years ago that may get adapted for this endeavor.  

Which leads me to my second resolution for 2024, to blog regularly.  For now, I am setting a goal of 15 posts in 2024, which, given my track record over the last couple of years, is plenty to aspire to!  

I really hope to get into a regular cadence of model building this year while working on the shelf layout to provide a place to enjoy completed cars.  Not going to call this a resolution, but rather a goal, with the pledge to blog helping to keep me on track.

Wishing all of you a very Happy Holiday season and all the best in the new year. 


Sunday, June 4, 2023

Onward!

 Well, it has been awhile.  Life gets busy at times, with family, work and...stuff.  While I have not been getting many models built, there has been progress on other fronts with my hobby.  These developments have re-energized me to get back to it.

Most importantly, we started construction of our new home, where we will retire, late last year.  I have a few years of work left but we have decided to make the move now, rather than hold on to both houses.  My work has been remote for years so no change there.  What will change is that we are downsizing substantially.  I am fortunate that I will have a dedicated space for a workbench and a small shelf layout, as final arrangements for our living space have developed.  This was a bit uncertain until we were well underway with construction and a serendipitous change was made in the location of the washer and dryer in our laundry room.

In progress photo, no lighting, tile not yet grouted


This is the space, small but can be dedicated to a workbench on the far wall with an "L" shape shelf layout above and on the left side.  It is about 7' x 5' of wall space.  The washer and dryer were originally to go on the wall to the left, below the cabinets but the plumber, in his wisdom, installed the connections on the wall behind me in this photo.  What at first seemed to be a mistake became an opportunity to gain more room for my hobby than we originally planned.  

My shelf may be a bit lower than originally conceived, to allow room under the cabinets, but I think it will be ok.  I was strongly considering a proscenium framed shelf design so will see if I can incorporate the cabinet as the top of my layout frame.  The counter on the right will have the laundry sink at the near end, not yet built out in this photo.  

Finishing work continues on the house, and we expect to move in sometime in July.  I will be moving my workbench and all hobby materials once we are in.  It may make sense to build a new workbench in place in the corner with the layout shelf above.

As typically happens, building a custom home, even a small one, has been an "adventure."  Coordinating subcontractors and working through the questions, crises and compromises has taken up most of my "leisure time" bandwidth this past year.  It is nice to see the end of the tunnel ahead.


Wednesday, April 6, 2022

Tale of The Tardy Tank Car

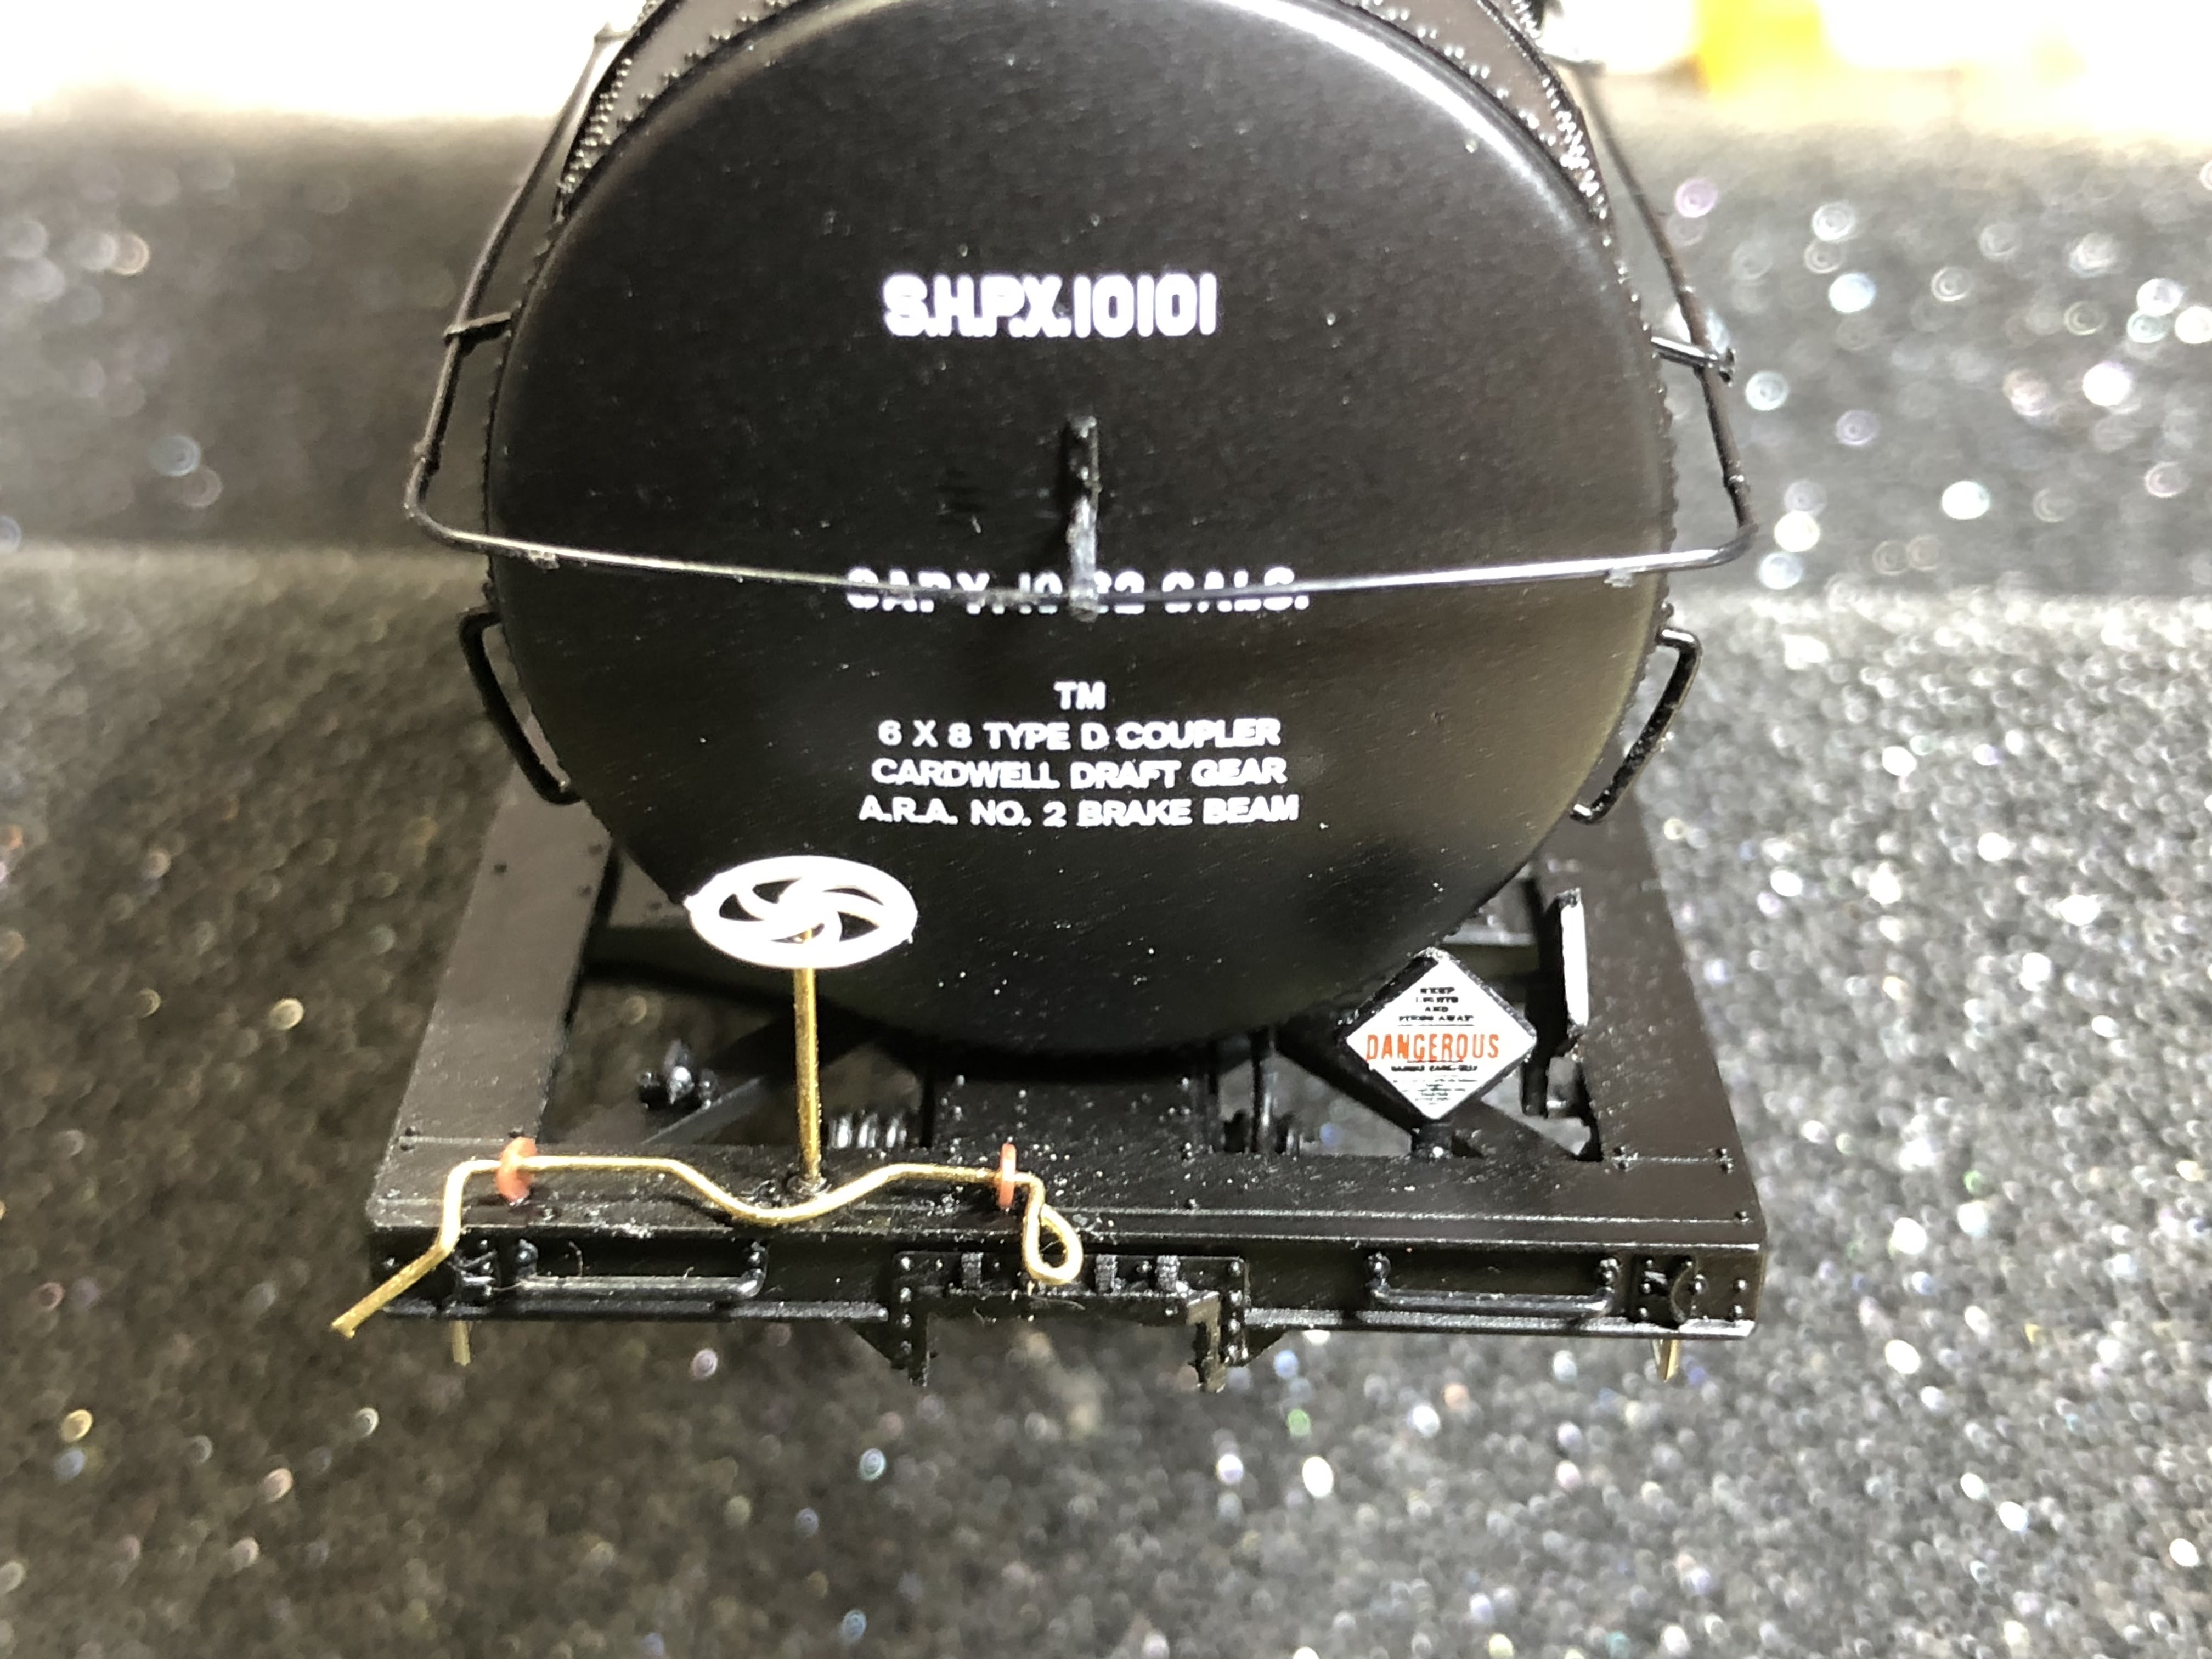
 There is a tank car on my workbench which seemed to have taken up permanent residence in a partially finished state until just recently.   I would pull it out, fiddle, ponder and slide it off to the side, having made incremental progress at best. I allowed contemplating some of the finer details to intimidate me until finally pushing through those challenges and finishing assembly last month.  Here it is now, just needing a coupler, the trucks mounted and a little touch up paint.


The model is a Proto2000 10,000 gallon Type 21 riveted tank, with nice detail and paint, including very fine printing. When I purchased it, I was taken with the binary road number 10101, and can always put  a plain black tank that could carry a variety of liquids to good use serving the mill. 

It built into a fine looking model, although there are some fiddly bits, particularly the tank band ends, and the hand rail around the tank.  These finally submitted to gel CA to help tack them in place.

While finishing the model was done at county road crew pace, I did take the opportunity to replace a few detail parts with wire and etched metal replacements for durability, and practiced my wire bending skills.

Last month I shared a wordless photo of the brake wheel end of this tank car after completing what was supposed to be the last detail.  Did you spot my mistake?

Unfortunately, in my excitement about finishing, I glued the brake staff and wheel in place with the coupler lift bar flipped back.  Due to the design of the lift bar with a curve to fit around the brake staff, it was trapped out of place 🤬.  Stepping away from the workbench, and handy implements of destruction, I calmed down and thought through how best to fix my goof. Remove the brake staff or the lift bar attachments?   I decided to remove the lift bar by cutting off the Tichy styrene eye bolts.  This then required drilling out the pin of the eyebolt left behind in the end frame so I could replace them.  I had wanted to try the Tichy eye bolts I had on hand and they do look nice.  It was also probably easier to replace those than it would have been to remove wire ones. Here is the final result.


Tichy .0125 inch phosphor bronze wire was used for the cut lever and .015 for the brake staff, with a Tichy brake wheel.  The kit styrene brake lever part was used as a template for bending the wire.  The A end lever is similar, without the curve to fit around the brake staff.  Bending the wire went well using several specialty pliers.  I have a small pair of chain nose pliers (red handle in photo below) that work well for tight curves.  The sharp angles were accomplished with Xuron 575 micro bending pliers along with their 450 tweezer nose pliers for holding (blue handles in photo below).


I also upgraded he kit provided sill steps with very fine looking etched metal ones that Yarmouth Model Works made specifically for this kit.  These add on details will get brush painted after cleaning with alcohol on a cotton swab to remove oils.


One other lesson learned was to consider replacing kit furnished styrene brake rods with brass.  I had already built the underframe per kit instructions early on and ended up breaking on of the brittle brake rods during handling in a later assembly step, so replaced one section with wire. I may end up replacing more.


All in all, a positive experience and a sense of accomplishment in getting this model out of the shop. Once painting is finished.


Merry Christmas!